Pages

Showing posts with label fabric. Show all posts

Friday, October 25, 2013

Bundle or cheat your way to a Paper Shredder quilt

Paper Shredder Quilt pattern originally published in Stitch, 2011

A couple bits of news about one of my most popular quilt patterns, Paper Shredder....

Firstly, Interweave has a great deal going on this month where you can get the Paper Shredder Quilt pattern, a couple more patterns by yours truly, the winter issue of Stitch, plus my home-dec video and webinar, all for only $39.99! Check out my home decor sewing bundle on Sew Daily.

Collage Newspaper Strips Red
Collage Newspaper Strips in Red by Carrie Bloomston of Such Designs for Windham Fabrics, 2013

And if you like the look of Paper Shredder but can’t be bothered to piece it yourself, I recently spotted a fabric print that might as well be a cheater cloth for Paper Shredder. But if you want the look of paper shreds piling up at the bottom of the quilt, you’ll still have to do it yourself—and if you’re looking for a bunch of text fabric to use, my website can help! Shop pages for patterns like Paper Shredder have a “Suggested Fabrics” section that links directly to hand-picked suitable fabrics on Fabric.com. (You can refresh the pattern page to see a different mix of fabrics.)

If these Suggested Fabrics listings are helpful to people, I’ll try to add them to more patterns and keep them up to date.

Wednesday, May 29, 2013

Swan boat and other Quilt Market antics

Spring Quilt Market

As promised, here’s Stitch editor Amber Eden and me in the swan-boat centerpiece of the Michael Miller booth at Spring Quilt Market in Portland. Fortunately it’s only a still shot, as my dismount was less than elegant. I bumped into Amber on her way in, and we had a great time checking out new fabrics together.

Spring Quilt Market

Market was a great reminder that the people I work with over phone and e-mail do actually exist in the real world! Here’s fellow Stitch contributing editor Linzee Kull McCray on the left with friends Jenny Gordy, Codi Josephson, and Greta Songe.

Spring Quilt Market

Days at Market are long, with parties going into the night after the convention itself closes. At the Portland Modern Quilt Guild’s event at Modern Domestic, I had the chance to meet Susan Beal, another Stitch contributing editor, who’s lucky enough to call Portland home. (Incidentally, at the same party, wearing the necktie I appliquéd for Stitch with Style scored me a dinner invite with the riotous trio of Rachel, Angela, and Gretchen—hi guys!)

You wouldn’t know it from the size of the convention hall, but the quilting/sewing industry is a small world—Linzee interviewed me for American Patchwork & Quilting many moons ago, I worked as a freelance editor on Susan’s book Modern Log Cabin Quilting, and now we’re all hooked up with Stitch. But I never would have expected to hear my name called across the floor by a family friend I hadn’t seen in at least 15 years—she was lending a hand with her sister’s booth, Eazy Peazy Quilts.

Spring Quilt Market

Meeting and catching up with people was half the fun—the other half was all the new fabric and tools being shown! I’m salivating for the Charley Harper line coming this fall from Birch Fabrics. I’ve put some other lines I’m looking forward to up on Flickr if you want a sneak peek of your own. I should have taken more photos of people and fabrics, but there were so many shiny, distracting things to see!

Wednesday, November 21, 2012

Solids in EQ7

It’s been awfully quiet round these parts, mainly because my book and several other projects are keeping me busy, but I wanted to come out of the woodwork to mention a guest post I wrote up for the EQ blog, which went live yesterday.

solidslib

It’s all about using solid fabrics in EQ7, including converting the built-in solid colors to real solid fabrics produced by various manufacturers. The magic ingredient is a Solid Fabrics library you can download and add to your EQ7 Fabric Library, painstakingly created by yours truly (OK, so I take perverse pleasure in cataloguing and organizing things like that, but it still took quite a bit of time).

The download link was left out when the post went up yesterday, so in the meantime you can download the library from my website. Update: The library file is now uploaded and linked from the EQ blog post, so you can download it direct from there too.

It’s a long post, but if you design in EQ and sew with solid fabrics, I think you’ll really find it helpful!

Monday, July 18, 2011

Free pattern: CD/FQ Box

CD/FQ Box

Timeless Treasures sent me some cool fabric to design a project with (thanks!), and since I’m always short on boxes to chuck fabric and other supplies in, I took the dimensions from some other boxes I use to store fat quarters and came up with this DIY version. The boxes I’d bought were made for CDs but work beautifully for fat quarters, so I’ve called my version a CD/FQ Box—use to corral your clutter of choice.

CD/FQ Box

The handle strap wraps around the bottom of the box to support it, and the instructions describe two ways of finishing the handles: the loose version shown above, and the tighter one I used on the other end:

CD/FQ Box

Download the PDF pattern here, and stop by Timeless Treasures’ blog SEW Timeless for more projects. And while sewing the box up, as always, beware of feline intervention…

CD/FQ Box

Wednesday, May 25, 2011

Shirtings are the answer?

I love a good yarn-dye, and back when striped shirts were one of my wardrobe staples (i.e., before the T-shirts and shorts of the freelance life), I was loath to buy stripes that were printed instead of woven—it just seemed chintzy, even before I had a real clue about textiles. Using shirting fabrics for sewing, however, really only entered my mind when Stitch was looking for projects for their “True Blue” feature. The only fabric more traditionally blue than denim is shirting—stripes, checks, herringbone, all lined up right there in the fabric store, almost exclusively in blues.

blue shirting fabrics

Usually they’re only used one at a time, whether as a conservative blue business shirt or a foppish seersucker suit, but they’re precoordinated with each other. So I patchworked them together to make this Shirting Stripes Toiletry Bag (the pattern is in the current issue of Stitch):

Shirting Stripes toiletry bag

So that’s how shirtings got in my brain initially. Then, while out tracking down some other non-quilting fabrics, I happened upon some more yarn-dyed stripes in less business-meeting colors:

red shirting fabrics

green shirting fabrics

Some were manufactured by Robert Kaufman in the familiar 44" width, but others were 56" or 58" wide and—here’s the kicker—about half the price of a typical yard of (narrower) quilting cotton. They’re a little thinner than quilting fabric, but you can’t beat the price per square inch. And if you quilt with any degree of devotion, you’ve heard the worrying news about rising cotton prices. So maybe turning to shirtings is one way to keep our costs down? After all, plenty of quilts were definitely made before such a things as purpose-made “quilting fabric” even existed.

I’m certainly not going to be forsaking quilting fabric by any means, but sometimes it’s fun to step away from the usual suspects. And no less a designer than Alexander Girard developed an expansive line of Mexicottons, yarn-dyed woven fabrics in strong color combinations (including a red and pink stripe rather like the one I found). For quilting, yarn-dyes give an extra dimension that isn’t possible when the design is only on the surface of the fabric, which is why shot cottons or crossweaves (or whatever you want to call fabric woven with different colors in the warp and weft) look richer than plain solids. Dobby weaves like in the upper-right red fabric add another design element. I’m starting to see more textural weaves in fabric in quilt shops, both imported from Japan and made by the U.S. manufacturers, so this type of shirting may not be that far from the fabrics offered to quilters after all.

That said, do I know what I’m planning to do with all these stripes? No, can’t say I do. But there’s totally a quilt in there somewhere; it’ll just take a few more trips to quilt shops and fabric stores. Which, of course, will defeat any of the original savings. Sigh. Whose idea was this cotton shortage again?

Wednesday, April 06, 2011

A few goings-on…

Transport pillow

Quilter's Home, April/May 2011A while back, I stitched together a pillow with tessellating arrows. It now keeps the Other company in his study, but it can keep you company too! That is, if you make one of your own using the pattern in the April/May issue of Quilter’s Home. (The one with that guy from Extreme Tearjerker: Home Edition on the cover.)

fabric bundle from Timeless Treasures

This saucy little bundle of fabric sauntered up the garden path the other day thanks to Timeless Treasures. I’m putting the finishing touches on a new project using the fabrics, and the tutorial will be available here soon for your delectation.

Tuesday, March 22, 2011

Fabric dyeing the easy way

I know spring has officially started, but I’ve still been diddling around with snowflake designs (and truth be told, there are still some Christmas winter decorations lingering around the house), so please forgive the aseasonality of the fabrics shown here.

Some time ago Michael5000 posted on his fabric dyeing experiments, including tie-dyeing on top of white-on-white print fabrics. The white ink resisted the dye, so the printed design popped out on top of the dye work. Seemed pretty cool, so I filed the idea away and it’s been rattling round the back of the brain ever since.

That said, I’m not really one for getting out sloppy buckets of dye—an art teacher once accurately observed that I was “one of those kids who didn’t like to get their hands dirty.” Even in kindergarten I refused to finger-paint, and I suspect the relative cleanliness of quilting contributed to its appeal to me as a craft form. At university, though, I had dyed a sheet set with a packet of washing-machine dye—tidy enough, as long as one remained vigilant against other students popping the machine open in mid-dye. Now that access to my washing machine of choice is limited to other members of the household (most of whom lack opposable thumbs), it’d be even easier…

I’ve been collecting snowflake prints with aqua and turquoise backgrounds for a quilt I’m working on, and I’ve managed to assemble quite a stash of them.

image

That’s just a snapshot of a few of the fabrics I’ve “catalogued”; I’ve searched far and wide (and raided the Mother’s stash) to accumulate similar prints to broaden the range. The more tones of blue-green there are, the better they’ll all work together (though I’ll probably save the apple-green print and some others for different projects). A few fabrics with lighter backgrounds will help the design I have in mind, but white-on-white wasn’t part of the plan—until I found some cool snowflake prints that reminded me of Michael’s dye job.

white-on-white snowflake prints

So I fired up the washing machine, dropped in a pack of turquoise Jacquard iDye, and turned my fingers a lovely Smurf blue while dissolving the packet—see, I’m not afraid of getting my hands dirty! (But next time, use a paint stirrer or something, clever one.) Then in went the fabric. Despite both fabrics being made by Maywood Studio, the one on the right in the photo above was a little yellower than the other, so I figured they’d come out slightly different shades. And sure enough:

overdyed snowflake print 2

overdyed snowflake print 1

The white ink on the bottom fabric resisted the dye more than the top one, so they don’t really look like they came from the same batch. The dye coverage was fairly even too. And now I’ve got two custom fabrics to add to my snowflake stash—and maybe I’ll have the quilt together in time for next winter.

Thursday, January 27, 2011

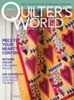
Grey Gardens pattern in Quilter’s World

Grey Gardens quilt

Quilter's World, February 2011I was inspired to design this quilt by the concrete blocks used in garden walls—the secondary circle patterns made by the block combinations have always appealed to me, and they seemed like a great candidate for recreation in quilt form. Pick up a copy of the February 2011 issue of Quilter’s World, break out the bias-tape maker and your favorite florals, and make up your own version!

I’ve had a few people get in touch asking about the fabric I used, and the simple answer is that it came from my stash. The border fabric, with flowers on a grey background, was from Denyse Schmidt’s first line, Flea Market Fancy. The Mother picked it up for me when it came out a few years ago, and I’d been saving it for the perfect project—the warm grey of the background suited the concrete concept for the Grey Gardens quilt, and I made sure the border was wide enough to show off the print. The same print in another colorway is used for a few of the block background squares, along with a couple Amy Butler fabrics and several others of miscellaneous origin.

Thanks to all the ladies who took my Grey Gardens class at my quilt guild yesterday! It was so fun to see the pattern taking shape in lots of totally different fabrics.

Thursday, December 23, 2010

Free printable snowflake fabric

printable snowflake fabric

Feed Dog Flurry Print your own version of the snowflake fabric I drew for my Christmas cards! Just download the PDF file, print on an 8½×11" sheet of printable fabric, and cut the swatches out for use in your own projects. Then drop me a line—I’d love to see how you use them!

Wednesday, December 22, 2010

Holiday cards, part II: removable fabric charm squares

piles o' Christmas cards

Feed Dog Flurry Christmas cards are out—hurrah! I’ve already shown you the fabric I drew in part I, so today I’ll show you just how I incorporated the fabric into the cards.

After much deliberating and prototyping, I decided everything would be much easier if I cut my fabric into mini charm squares—that is, 4" squares rather than the “official” charm square dimensions of 5". Shrinking to that size meant I could still feed the cards through my Sizzix BigKick machine for cutting and embossing without resorting to a nonstandard envelope size. So I made my cards A2 size, or a 5½×8½" sheet (half a letter-size page) folded in half, and may I just say that this designation is tremendously confusing as it has nothing whatsoever to do with international standard “A” paper sizes, by which “A2” would be about 4 times the size of letter paper. Anyway, now I know. And so do you, in case it ever comes up on Jeopardy.

card without fabric

I printed my text and a snowflake on the inside of the card so it would be visible when I cut a window out of the front using a Sizzix Movers & Shapers snowflake magnetic die (you could cut a window whatever shape you want with a craft knife, of course). I embossed the card fronts with their Snowflakes #6 and Snowflakes #2 Textured Impressions folders after cutting the windows.

freezer paper card innards

So here’s the trick: inside the card is a sheet of freezer paper that simultaneously explains to the recipient that yes, you should pull the card apart, and holds the charm square in place until the peeling commences. To hold the 4" square of fabric on the 4¼×5½" panel of the card, I set up 4⅛×5" freezer-paper labels, printed four on a page with an inkjet printer, and cut them to size. Precut letter-size freezer paper makes this a snap (and is a little meatier than the supermarket stuff), but you can cut regular freezer paper to page size for printing too.

charm square with freezer paper backing

Then place a charm square facedown on your ironing board, center a freezer-paper backing over it (shiny side to the fabric), and press the paper in place. When it’s cooled, peel the paper off your ironing board. There should be about ½" of freezer paper extending past the fabric on the top and bottom.

charm square adhered to card

Those ½" margins will adhere the freezer paper to the inside of the card front: iron them to the cardstock gently and they should stick well enough to hold the fabric in place without squashing the embossing. It doesn’t have to hold with the strength of a thousand men/women/beasts, since you’re telling people to tear it off when they get it.

front of finished card

Close the card up, and there’s the fabric! I could have drawn my snowflakes so they’d be centered in the window, but just cutting the fabric as it was leaves the snowflakes peering enticingly through the window.

card with stamped envelope

Since I was on a papercrafting kick, I stamped the envelopes to match. But hopefully the cards use papercraft to show that I’m a fabric guy while giving my contacts a little tidbit of handmade fabric for their stashes.

I’ve got a little something for my blog readers’ stashes, too, so stay tuned!

Tuesday, December 21, 2010

Holiday cards, part I: discharge-dyed snowflake fabric

snowflake fabric

Since most of my work deals with fabric, I wanted to use fabric in my business holiday cards, and I wanted to design it myself. Snowflakes turned out to be the perfect motif for trying out one of the brilliant techniques in Amy Karol’s Bend the Rules with Fabric: discharge dyeing with a bleach pen. It took a while to find the metal tips she recommends for getting fine lines, but I finally discovered a pack of bottles with similar fine metal tips in with the glass- and porcelain-painting supplies at Michaels (I saved the label for reference, but it’s likely hidden under a pile of junk; I’ll update with details when I find it).

snowflakes on lighter fabric

I drew the snowflakes on the fabric freehand, without a plan, just sketching with the bleach pen. Some of my flakes turned out better than others, but the bleach bleeding into the fibers gave the lines an almost glowing effect that I think looks quite cool. The color revealed by the bleach was a little different for each base fabric I tried.

snowflake fabric

I had previously accidentally spritzed some diluted bleach on this chunk of fabric, which added some background interest behind the flakes.

snowflake fabric

I’m itching to try some printing techniques to make more snowflake fabric (or wrapping paper!), but Christmas draws near and time grows short.

Next up, I’ll show you how I put removable charm squares of the fabric into my Christmas cards as tiny holiday presents.

Thursday, April 22, 2010

Fabric options for Hilltop Drive quilt in Stitch

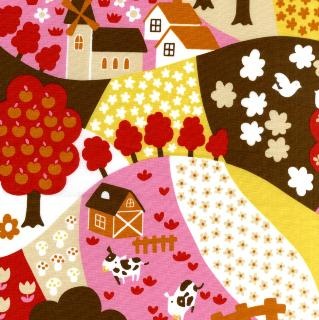
Have you seen the new Quilting Arts Stitch? I’m itching to get my copy and see all the projects they’ve packed into the spring issue. One of the projects I contributed was a baby quilt inspired by a fabulous Japanese import fabric printed with rolling country hills with cars, cows, and windmills (the top half of the quilt).

Hilltop Drive quilt

I’ve already had an e-mail from a reader of the magazine (hi Gwen!) asking what that fabric was. It’s from Kokka’s Trèfle collection, and I picked up my half yard from Hart’s Fabric in Santa Cruz (totally worth the drive from the Central Valley). They seem to still have it in stock for online orders if you’re interested in using the very same print. For a different project, I have the fabric in a different colorway that could also be fun in Hilltop Drive:

pink Trefle countryside

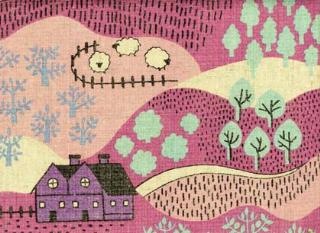
Since sending the quilt off to Stitch, I’ve been keeping my eye out for other landscape prints that could be used in the pattern. Hart’s has another pink Japanese import:

pink Japanese landscape print

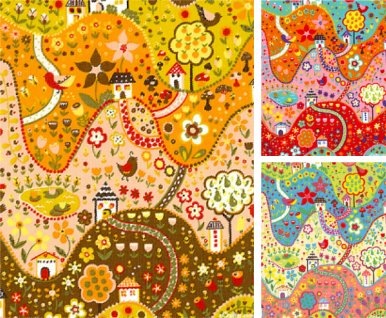
Cute as they are, imported fabrics can get pricy (and hard to find), but American manufacturers have recently released a few prints that would work smashingly. I love this Willow Grove print from Alexander Henry, available in three colorways at eQuilter—ivory/lime, rose/turquoise, and my favorite, blush/honey:

Willow Grove hills print

For a softer look, Chez Moi’s Hunky Dory has a hilly stripe print (in deep aqua, petal pink, light honey gold, and buttercream at eQuilter):

Hunky Dory meadow stripe

There’re also some nice grassy hills in Kate Honarvar’s Red Riding Hood line:

Red Riding Hood hills print

But who says you have to use hills at all? Anything that could represent sky would work nicely instead of the landscape—try fluffy clouds, or a print dotted with stars for a nighttime drive. Do share any clever ideas you have in the comments, and check out Stitch to get the pattern—then upload a photo of your own version to the Feed Dog Designs photo pool!

Tuesday, July 14, 2009

Round the web with EQ

I was thrilled when Kim Kight of the incomparable True Up asked me to review the latest edition of the Electric Quilt Company’s fabric-swatch software Stash—call it a perk of using an overheating HP instead of a shiny Mac! Playing with the software and figuring out if I would shell out the cash for a future edition was a lot of fun. Check out the review on True Up.

Over at the EQ blog, I was asked to write a bit about how I designed my most recent project for American Patchwork & Quilting, Dot to Dot, using EQ6. Head over to the EQ Blog to read about the design and see a few Random Recolor experiments.