Jump over to Ebony Love’s LoveBug Studios for a guest post on die cutting for appliqué. While you’re there, enter to win some wool charm squares!
Monday, February 24, 2014
Blog Tour day 4: LoveBug Studios
Jump over to Ebony Love’s LoveBug Studios for a guest post on die cutting for appliqué. While you’re there, enter to win some wool charm squares!
Tuesday, August 07, 2012
Free pattern: Hexagon pincushion
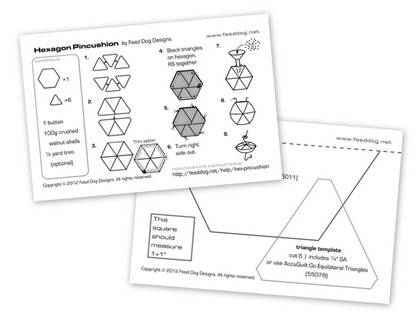
When I originally posted my hexagon pincushion tutorial, it was with the assumption that you’d use an AccuQuilt die cutter to cut out the fabric. Of course, that’s not to say you couldn’t make it with templates and scissors! To hand out at my quilt guild, I made up some “recipe cards” with illustrated steps on one side and templates on the other.
If you want to make your own hex pincushion, you can download the PDF here and print it either onto a 4×6" index card or 2-up on a single letter page. I’m partial to the index card format myself, but then again, I’m a sucker for anything formatted as an index card. I can’t be the only one…
Monday, September 05, 2011
AccuQuilt giveaway winner!
The votes are in, and your favorite block was the one designed by
Belinda K.
of Blue Ribbon Designs
The seasonally appropriate block combines appliqué using shapes from the 55041 Fall Medley and 55331 Stems and Leaves dies with a pieced nine-patch background (55021 Value Die), plus a couple details from the 55012 Circles die. Lots of possibilities for fabric choices and quilting/threadplay here…
I’ve e-mailed Belinda to claim her prize—an AccuQuilt Go Baby fabric cutter and her choice of three compatible dies. Congratulations Belinda! (Check out her blog to see some lovely pincushions she made using my tutorial.) Thanks again to those who entered other fantastic block designs, and to all of you who voted. And of course, thanks to AccuQuilt for sponsoring the giveaway!
Monday, August 29, 2011
Giveaway: Vote for your favorite block to choose a winner!
The entries are in for the AccuQuilt block design contest—who wins the Go Baby cutter and dies depends on whose block is your favorite. Take a look at all the entries, then vote at the bottom of the post (votes are limited to one per person/IP address, so choose carefully!). Voting ends Sunday, September 4 at 11:59pm PT.
I’m thrilled that these blocks use AccuQuilt dies in clever ways I never would have thought of. The dies each designer used are listed so we can all benefit from their creativity. In general I’ve listed extra info the designers sent regarding block size, specific die shapes used, etc.—a couple designers also sent pictures of quilt layouts using their blocks, but in fairness to everybody I’m just posting the blocks themselves. But keep potential block settings in mind when picking your favorite!
Thanks and good luck to everyone who entered, and thanks for voting!
Anne V.
Dies used (10" × 10" block):
- 55007 Round Flower (for the outer eye, inner eye, feet, forehead, and beak)
- 55328 Tulip (for the wings)
- 55331 Stems and Leaves (for the ear tufts, branch, and leaves)
- 55036 Apple Core (for the body)
Barbara D.
Dies used:
- 55041 Fall Medley (pumpkin, acorns, and leaves)
Belinda K.
Dies used (12" × 12" block):
- 55021 Value Die (4½" square for nine-patch background)
- 55012 Circles (2" circle)
- 55041 Fall Medley (acorns and leaves)
- 55331 Stems and Leaves (slightly curved stem)
Darlene M.
Dies used (starting from a basket block in the EQ7 Block Library):
- 55045 Rose of Sharon (flowers, circles, and leaves)
- 55331 Stems and Leaves
Michelle F.
Dies used:
- 55331 Stems and Leaves (overlapped large and small leaves, branched and S-shaped stems)
- 55042 Funky Flowers (overlapped “flower that looks like a fat man figure”—I love that description!)
- 55334 Fun Flower (overlapped)
- 55045 Rose of Sharon (overlapped circles).
- 55054 Strip Cutter – 4½" (for nine-patch background)
Michelle S.
Dies used:
- 55327 Daisy (for leaves)
- 55334 Fun Flower
- 55064 Gingham Dog
Sara P.
Dies used:
- 55331 Stems and Leaves (for wavy appliqué background)
- 55007 Round Flower
VOTE!
Monday, August 22, 2011
EQ7 Tutorial: Changing block size and merging shapes into a single EQ block
If you’ve started working in EQ7 on your block design competition entry, you may have noticed that the AccuQuilt blocks are drawn at the same overall size as the corresponding die—so if you want to use shapes from a 6" × 12" die, say, it looks like your block has to be that size: if you change the dimensions of your block canvas in EQ, the shapes change too, which means they’re no longer cuttable using the the dies. It gets even trickier when you want to work with shapes from multiple dies to make a block, especially when the shapes come from dies that are different sizes.
But it can be done! This 12" block is proof of that. It uses shapes from the Go Daisy die (6" × 6") and the Go Feathers die (5" × 10"), and the shapes are all kept at their original, die-cuttable sizes.
Here’s how I was able to retain the original sizes and work with shapes from multiple dies in a single block. This is the easiest way I’ve found, but leave a comment if you have any other tricks!
- After adding the AccuQuilt die blocks you want to work with to your Sketchbook, open one of them on the Block Worktable (this one is the full Daisy block). Make sure your Precision Bar is showing (turn it on or off in the View menu). Select all the shapes shown in the Applique tab with the Pick tool (hit Ctrl+A to select them all automatically), and note the dimensions shown in the Precision Bar:
- Deselect the shapes by clicking elsewhere on the worktable. The Precision Bar will now show the size of the block itself:
Since the Daisy die measures (nominally) 6" × 6", that’s the size this block was drawn at. Change the numbers in the Block Width and Block Height fields to the size you want your actual block to be—for this example, a 12" × 12" block. The shapes will stretch to match the new proportions:
As a result, the block looks exactly the same at this point—only the ruler and Precision Bar show that it’s been scaled up to 12". But we want to use shapes we can actually cut with the die, so they have to be changed back to the size they were in the 6" block. - Select all the shapes again.
The dimensions now shown in the Precision Bar aren’t significant. Replace them with those you noted in Step 1, and you’ll get this:
The shapes are now back to the size at which they were originally drawn—that is, the size the die will actually cut. Save this block to the Sketchbook. If you want to design a block using shapes from just this one die, you can go ahead with your design at this point. But if you want to add shapes from other dies… - View the Sketchbook and edit the block with the shape you want to add. I only needed the teardrop shape from the Feathers die, so that’s the block I used. Again note the dimensions of the shape(s):
Then copy the shape to the clipboard, using the toolbar button or Ctrl+C. - View the Sketchbook again and edit the block you saved in Step 3. Then paste the shape from the clipboard (toolbar or Ctrl+V). It will be selected when you paste it, showing that its dimensions have changed to suit the proportions of the new block:
But again, this isn’t the shape’s size on the actual die. - Change the shape dimensions to those you recorded in Step 4:
Now the shape is scaled appropriately, and you can move, rotate, flip, and otherwise rearrange the shapes with confidence that the die cutter will still work—as long as you don’t resize the shapes, of course.
By the way, this method will work for any EQ blocks, not just those based on AccuQuilt dies—pull shapes from the Block Library blocks into your own designs, or vice versa.
Thursday, August 18, 2011
Giveaway: AccuQuilt Block Design Contest
Want to win your own AccuQuilt Go Baby die cutter and your choice of 3 dies? Well, AccuQuilt and I want to send them to you! I’ve always found Lady Luck to be a bit of a b*tch, so to win this giveaway you have to get creative—I want to see what you’d do with your die cutter.
Wednesday, August 03, 2011
Tutorial: Fussy-cutting stripes with AccuQuilt triangle dies
Triangles cut from striped fabric can be used for lots of cool piecing effects, like setting the stripes to make concentric shapes or to radiate from a central point, as in this version of my hexagon pincushion. With a little care, this is pretty easy to do using an AccuQuilt Go triangle die—I’m again using the trusty Equilateral Triangles die they sent me, but this method could be adapted to any die for half-square triangles, isosceles triangles, or what-hast-thou.
Definitely start by watching Ebony Love’s video series (part 1, part 2, and part 3) on marking AccuQuilt dies. She gives a very thorough explanation of how she marks her dies not only to make the blades easier to see but also to help with fabric placement. Per her recommendation, I used a silver Sharpie pen to mark up my die; other opaque, light-colored permanent markers could work too.
Wednesday, July 27, 2011
Tutorial: AccuQuilt Equilateral Triangle pincushion
When I first talked about the dies AccuQuilt sent me, I mentioned that dies like the Equilateral Triangles and Hexagons were designed to work together. If you sew six of the triangles together, they’re the same size as the corresponding hexagon—and that’s really all there is to this pincushion! But I’ll walk you through the details.
For most of the pincushions I’ve made so far, I used two different fabrics (longtime readers may recognize scraps from my Hilltop Drive quilt for Stitch), but you could also make it scrappy with a different fabric for each triangle. In my next post I’ll show you how I matched the stripes up using just one fabric for the pink pincushion.
Each of these dies has three sizes of the shapes; this tute uses the biggest ones, but the process would be the same to make a smaller pincushion with the smaller shapes.
What you need
- Scraps of fabric for triangles, each at least 3×3"
- 4½×5¼" scrap of fabric for backing
- AccuQuilt GO! Equilateral Triangles Die (55079)
- AccuQuilt GO! Hexagons Die–2", 3", 5" (55011)
- AccuQuilt GO! or GO! Baby die cutter and 6×12" cutting mat
- Ground walnut shells (sold by pet stores as bird litter) or other filling
- Button
- Extra scraps of fabric or felt for flower embellishment (optional)
- Needle and thread, sewing machine, and the other usual suspects
How to make it
Seam allowances are ¼". Sew all pieces with right sides together unless otherwise specified.
- Using the dies, cut out 6 large triangles and 1 large hexagon. I cut 3 triangles from each of my fabrics. Arrange the triangles to form a hexagon, alternating fabrics. Try to align the fabric’s grain with the dies’ blades so at least one edge of each piece will be on the straight of grain.
- To avoid Y-seams, sew the triangles together to make 2 half-hexagons, 3 triangles each. (Use a short stitch length if you’re filling with small particles like walnut shells.) Chain-piecing makes this super easy: sew the first 2 triangles from the left half-hexagon, then the first 2 triangles of the right half-hexagon, then add the third triangle to the left section, then the third to the right. Press the seam allowances in opposite directions for each half-hexagon.
- Put the half-hexagons right sides together, matching up the outer edges and the seams. Pin if desired (I just rely on my machine’s dual feed for small projects like this), and sew the half-hexagons together on the longest edge. Press the seam allowance to one side. You should have a pieced hexagon equal in size to the die-cut hexagon, and thanks to the blunt corners of the triangles, no dog ears to chop off. I forgot to take a picture of this for the blue and green pincushion, so here it is in pink:
- Put the pieced and die-cut hexagons right sides together. To help turn the open edge in after filling the cushion, start sewing perpendicular to the edge, sewing in ¼" and then pivoting 90 degrees to sew the actual seam. This photo shows the stitching at the start of my seam on the left, and the presser foot is positioned to sew out to the edge the same way after sewing all the way around the hexagons:
Leave a gap as shown for filling, and sew the hexagons together using the triangle seams as guides for where to pivot at corners—when your needle meets the stitching, leave it down in the fabric (shown below), lift the presser foot, pivot to sew the next side, put the foot back down, and keep going until you get back the triangle you started on (finish the end as shown above). - Clip the corners (and pretend my seams are perfect).
- Turn the cushion right side out through the gap, using a chopstick or other blunt tool to gently push out the corners, then give it a quick press. Looks much tidier this way, no?
- Spoon walnut shells into the cushion through the opening. You may want to set the cushion in a small box or bowl to catch any shells that go astray. Walnut shells are supposed to act like emery to sharpen pins, and I also like that they give the pincushions a little more heft than polyfill. A 7-pound bag of ground shells cost me about $10 at the pet store and is way, way, way more than I needed for all four of these cushions; I’m going to share the remains with anybody at my quilt guild who wants to make pincushions for our quilt show shop. Anyway, stuff the pincushion as full as you’re comfortable with, but make sure there’s a little give so you can cinch through the center without bursting seams and showering your sewing space in nut shells. Then ladder-stitch the opening closed.
- If your button isn’t particularly dazzling, cut a flower or two from felt or fabric and center it right side up on the top of the pincushion. Using strong thread, sew the button centered on top, sewing all the way through the pincushion to cinch it in the middle. The stitches on the back may want to pull the weave of the fabric open if your cushion is heavily filled; if you prefer, sew through another small button on the back to support the stitches.
All done! You can probably whip up a cushion faster than it took to read the instructions.
These pincushions would be great foundations for embellishing further—you could insert rickrack in the side seam or put more elaborate fabric flowers on top, or even just use a fancier button than I had in my stash. Leave a comment if you have other ideas!
If you’ve got a charity event coming up, feel free to make bunches of ’em to sell—the combination of scrap-friendliness and quick die cutting means they can be cranked out efficiently.
As mentioned above, stay tuned for details on how I marked up my die to fussy-cut striped fabric…and to learn how you could win your own Go Baby cutter and dies from AccuQuilt!
Friday, July 22, 2011
Initial thoughts on the AccuQuilt GO! Baby die cutter
AccuQuilt generously sent me a Go Baby die cutter to play with, and I’ve been doing just that in the spare moments during the move. I’ll have some fun projects and more specific ideas shortly, but for now I thought I’d make note of some of my first thoughts on the cutter.
Not a rotary replacement: I don’t say this as a bad thing at all! Instead, it does what rotary cutters can’t do. All the publicity materials for Go cutters say that die cutting is up to 90% faster than rotary cutting, but with all due respect to the company that sent me free stuff, I can’t say I really give two ticks. Even after using die cutters for a while, for me, cutting strips and squares is still a job best assigned to the rotary cutter. It’s not about fabric wastage, which I know is a big concern for some die-cutting resistors (AccuQuilt is great about giving specific instructions for how to fold fabric to minimize waste)—it just feels simpler to slap the yardage down on the cutting mat and slice through it. What I do find delightfully appealing about die cutting, though, is the ease with which you can cut shapes that are impractical or impossible with rotary cutters: hexagons, certain triangles, circles, and a whole plethora of appliqué shapes (especially nice when you need mountains of the same shape). So just as the dawn of rotary cutters didn’t mean scissors were suddenly banished from our sewing rooms, die cutting can be thought of as another cutting method to have in your arsenal—choose whichever tools are best suited to the task at hand.
Portability: The cutter folds up into a compact little package that’s easy to carry around and, more to the point, store. Even the full-size AccuQuilt Go dwarfs this thing, and you can still cut any Go die up to 6" wide (the opening’s actually about 7" wide since the 6" measurement is only nominal). The footprint when closed is probably a quarter of my other comparable die cutter. I thought maybe the fold-down sides/platform would be flimsy, but they feel solid and turn smoothly. And they latch closed with a hidden magnet, which feels super sleek and also means there aren’t any plastic latches to break from wear. It also comes out of the box completely assembled, handle and all.
Die catalog: Since AccuQuilt is dedicated to quilting, you’re using dies made specifically for quilting: corners are blunted and curved edges notched for easy alignment, so you get all the benefits of using a template without the drudgery of actually having to make a template. Many of the dies are also designed to work together. In upcoming posts I’ll show you some ways to use their Equilateral Triangle and Hexagon dies together—you can use the triangles between hexagons to eliminate inset seams, but there’s lots more you can do too, like making a six-pointed star:
The white snowflake in the middle is from the Sparkle-Snowflake die. When I’m done embellishing and constructing, this’ll be a potholder, and I’ll post a full tutorial here.
I’ll also have a tute for this easy pincushion:
I’m on the committee for the quilt guild boutique at our upcoming quilt show, so I’ve had small, fast, easy projects on the brain, and die cutting is a huge help—it’s not just for quilts!
Another of my favorite quilting tools, EQ7, works well with die-cut appliqué shapes, especially using the WreathMaker function:
I was originally thinking of these medallions as quilt blocks, or I might cut the shapes from felt and make a pillow or wallhanging. Again, I’ll give you all the details! Stick around…or if you’re dying to get started, click the button to the right to sign up for AccuQuilt’s e-mail list and get 22 free patterns, and take a look at the other ideas on accuquilt.com.
Wednesday, February 16, 2011
Stitch, Spring 2011: Fabric Nesting Bowls
You might not naturally put soccer balls and Grandmother’s Flower Garden quilts into the same category, but they actually have some similarities: by using pentagons for some of the pieces instead of hexagons, you can make a round ball instead of a flat quilt. Or, in this case, a bowl that (I think, anyway) looks kind of like a six-petaled flower.
After sewing these up, I can understand the addictive nature other English paper piecers have described—it’s perfect work for in front of the TV or on the go. And the bowls are kind of functionalist in that the “paper” conventionally used in English paper piecing gives the bowls their structure. But you’ll have to check out the spring issue of Stitch to see what I’m talking about!
The sneaky trick the magazine doesn’t reveal, though, is die cutting: for the medium-size bowl, cut the interfacing with the Ellison 2" hexagon die (or the $5 clearance version!) and 2" pentagon die and you can save some tracing of templates. Then the larger and smaller versions just offset the edges of those pieces by ¼" either way. You could try using the three different sizes of hexagons on the AccuQuilt Go hexagon die; just make the bottom edge of the pentagon templates the same length as the corresponding hexagon.

Friday, December 24, 2010
A Christmas Eve flurry
The big day is almost here, and there’s so much more I wanted to share with you! And more things I wanted to make for gifts, and gifts that haven’t even been shipped yet…but instead of lamenting what didn’t get done, I thought I’d celebrate something I did do with one last burst of snowflake ornament photos. Mostly felt with some cardstock ones mixed in this time, cut with a ballooning collection of Sizzix snowflake dies and glued together in the spare moments amid Christmas crisis control.
Hope you all have a lovely Christmas!