Pages

Showing posts with label office/sewing room. Show all posts

Monday, February 03, 2014

Mid-Century Monday: Boby taboret for sewing storage

The Other found me the best present ever! He spotted this organizer in a thrift store and thought it might be helpful for my sewing bits and bobs. “If you don’t want it, it was only $2,” he said, since it was fairly covered in paint, scuffs, and grime. He didn’t know what he’d scored, nor did the shop that priced it! (All photos are after cleanup.)
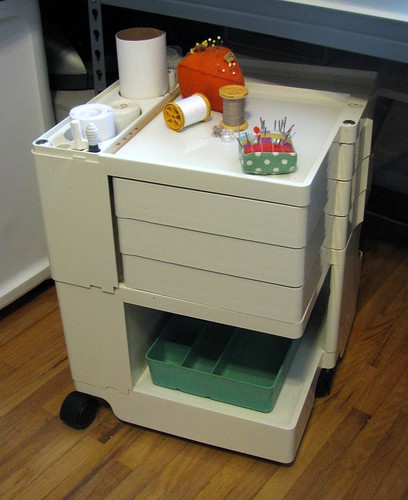
Boby taboret for sewing supplies

So what is it? The sorter in me is delighted with its functional features, but I also knew straight away that it was not just any organizer, but a classic Boby taboret, designed in 1969 by Joe Colombo. The space-age styling and practical compartments have long appealed to me, but the $300 pricetag for a new version kept it strictly in the realm of covetousness. (Of course, 45 years in production, then as soon as I look it up to check the current price, nobody’s selling it.) So after a once-over with a damp cloth and a twice-over with the same stuff I used to clean up my Genie, there’s an authentic piece of mid-century modern design in my sewing room, all the more exciting for being such a bargain!
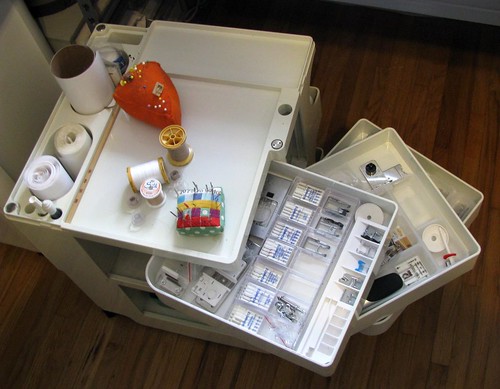
Boby taboret - drawers open

Mainly designed and/or sold for fine artists, the brilliance of Boby is that he’s chock full of compartments of different sizes and configurations—much more useful than a stack of same-size drawers. There are tiny wells for paintbrushes, deep ones for rolls of paper, bulk cubbies for chunky stuff, and shallow drawers for small pieces. In other words, perfect for sewing supplies!
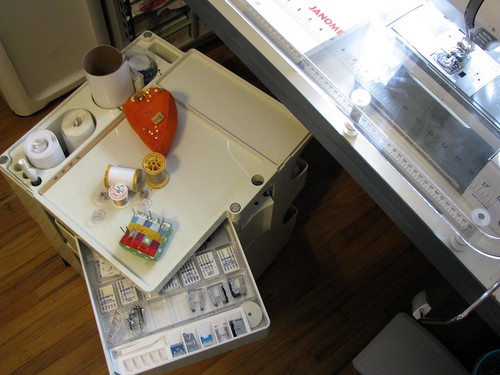
Boby taboret for sewing supplies

Rather than floating around the room at random, rolls of fusible web, freezer paper, and stabilizer can live in the deep sections, along with my slippery quilting mat. Instead of brushes, a seam ripper and screwdriver are kept close at hand. And the flat top gives a surface to corral spools, bobbins, and any of those other current-project things that tend to float around a sewing table. My Boby’s shorter than the standard model, so he rolls right under the sewing table when not needed.
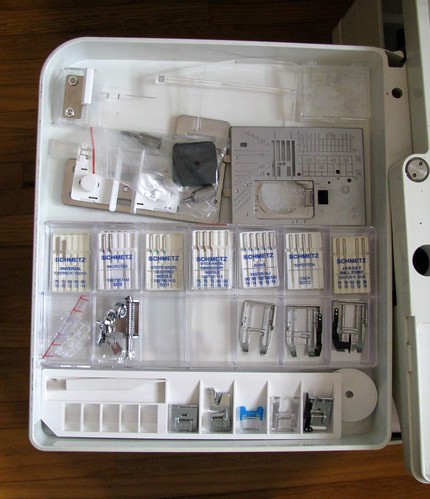
Boby taboret - top drawer

But the drawers—oh, the drawers! My Boby model has three shallow swing-out drawers instead of two deeper ones. This is ideal for presser feet and machine needles. I’m constantly switching feet while I sew, and my Janome 8900 uses some fairly bulky dual-feed feet that now have a home of their own in the top drawer.
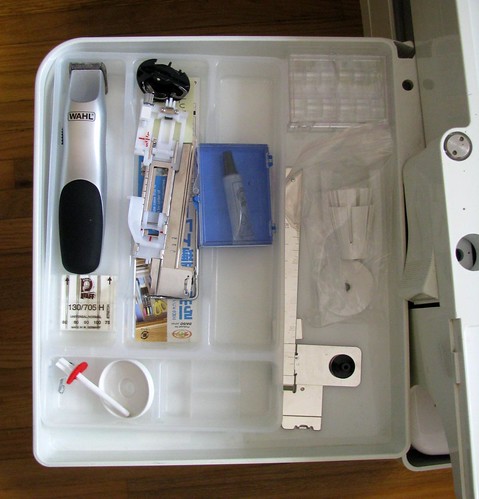
Boby taboret - middle drawer

Things like spare spool caps and spool pins live in the next drawer down—easy to get to, but tucked away. (Away from dust and curious cats, that is.) Bulkier machine attachments and occasionally used stuff is here too.
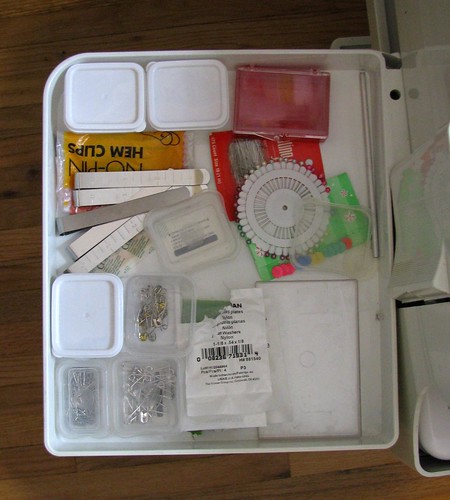
Boby taboret - bottom drawer

The bottom drawer holds various pins and clips. Like the fusible rolls, these previously didn’t have a proper home and wandered untamed around the sewing room. Just getting the rolls, pins, and presser feet in order was worth the $2.
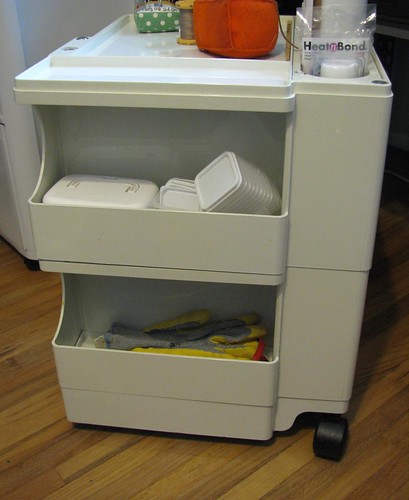
Boby taboret - back

The cubbies round the back are just right for mid-size items like quilting gloves and a bobbin winder. They were always awkward when I had them in drawers with smaller items like thread spools.
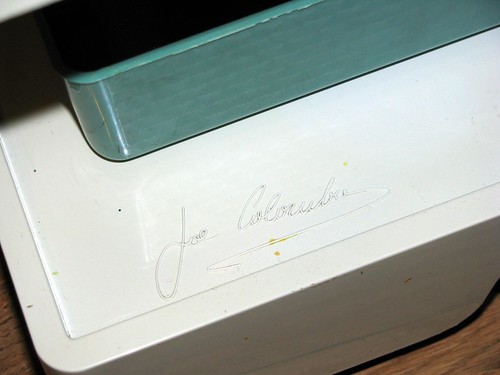
Boby taboret - signature

I haven’t decided on a definite purpose for the largest cubby at the base of the unit. There’s a molded signature down there proving Boby’s no knockoff—along with some bits of paint and ming I wasn’t quite able to get rid of, proving that this particular Boby’s no mere showpiece. I fully intend to continue using and loving him.

And though I tease the Other about his near-constant thrift-store circuit, I should probably just appreciate it! He scored another great mid-century find which I’ll share next time.

Tuesday, October 01, 2013

Needle storage for fun and function

English post box needlecase

I was looking for a way to dress up some wood needle cases, and suddenly it struck me—they’re shaped quite a bit like English pillar boxes! A couple coats of paint and a royal cypher later, they truly looked the part. I sent one to the Mother and kept another to hold my own appliqué needles.

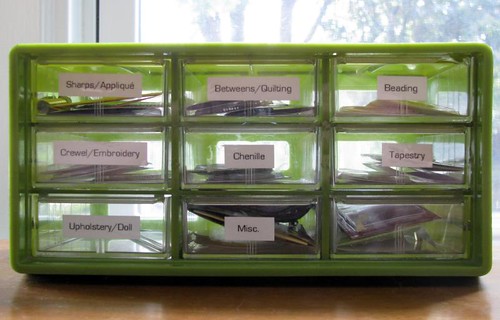
Of course, the post-box needle case is just a fun way to tote my most-used needles around. Coincidentally, I’ve also worked out how I want to store packs of hand needles, after much deliberation: an unassuming plastic drawer unit.

hand needle storage drawers

Prior to this little number, I stored needles based on purpose—embroidery needles with my embroidery floss, appliqué needles with my appliqué toolkit, betweens with my hand-quilting threads…. It sounds logical, but I often found myself digging around more than necessary to get at a needle: if I was doing a little embroidery with pearl cotton, I still had to get out all my stranded floss ’cause that’s where the needles were. If I wanted a tapestry needle, had I left them with needlepoint stuff, or were they in with the flosses too? And what about basic sharps and other miscellaneous needle types? I had packs of needles tucked in all kinds of places and never seemed able to find just want I needed, even though I knew I had it somewhere.

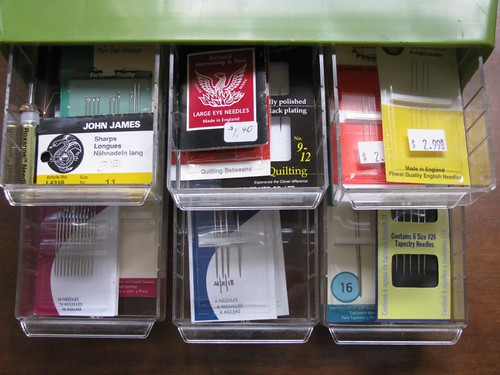
hand needle storage drawers

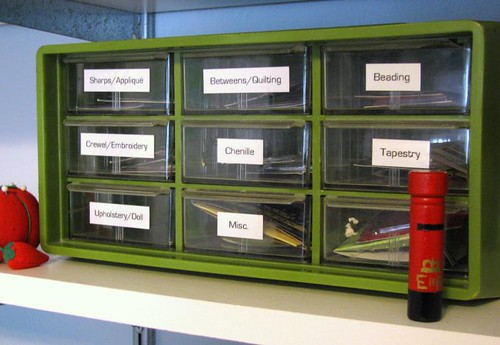
The drawers comfortably contain pretty much all the various forms needle packaging takes—hang cards, envelopes, tubes, folders, you name it. I labeled the drawers so I can still sort the needles by type, but now I have a central location for them all to live while waiting for active duty (at which point they take up residence in a needle book). Finding particular needles is much easier, and I can easily see what I have and what needs replenishing. Many of my organizing ideas don’t last very long in practice, but this is one I’ve been able to stick with.

hand needle storage drawers

How do you store your hand needles?

Tuesday, March 30, 2010

Rotary cutters quilt

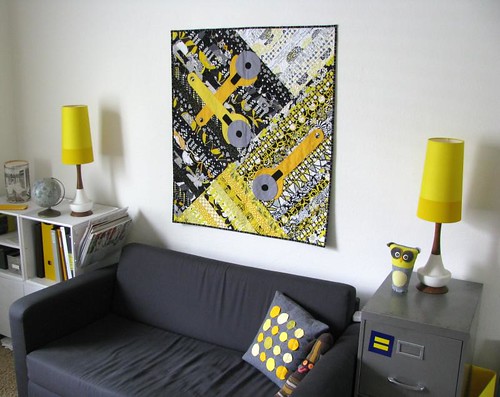
rotary cutters quilt on my office wall

I made this quilt for a challenge at Queen B’s Quilt Shop. One of the fabrics we had to use was a black, white, and yellow floral; the other was a yellow dot. I’d been working on another quilt in these colors, which was the real reason I bought the challenge fabric. I had no idea what I was going to make for the challenge itself until I was cutting for the other quilt and set my rotary cutter down on the stack of fabrics. Lo and behold, it matched! Et voilà.

It’s back from the shop and up on the wall in my office now
(oh, and it was voted third place in the challenge!), setting the color scheme for the room.

Monday, August 10, 2009

Vintage Sewing Rooms: storage cubes

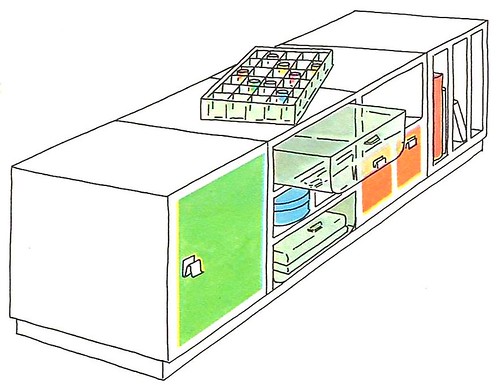
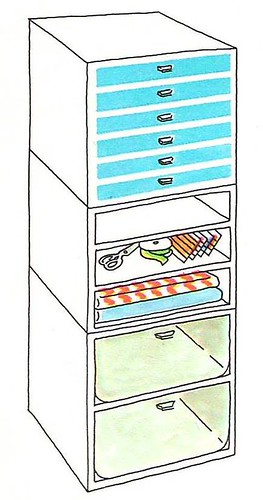
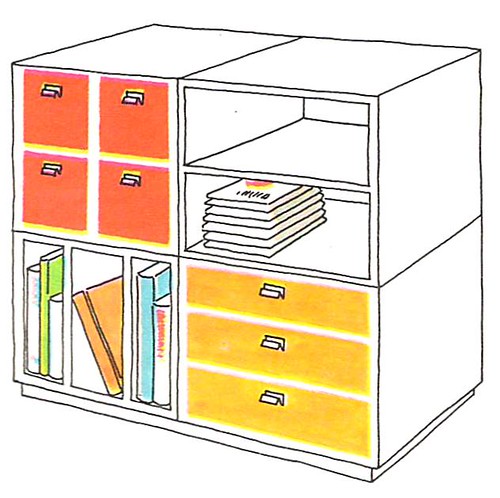
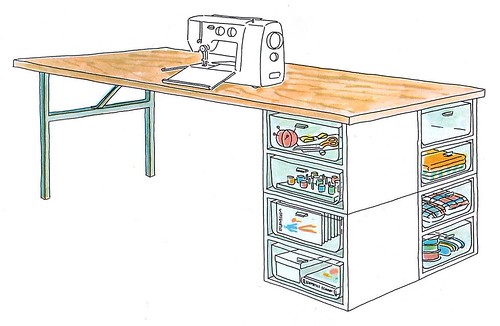
Using cubes for storage in sewing rooms is nothing new—here’re some configuration ideas from the 1976 Reader’s Digest Complete Guide to Sewing.

3808352281

Long, low arrangement provides bin, shelf, and drawer storage, stand-up slots for books or patterns. Tops make a convenient surface for sorting and selecting.

3808352571

Stacked cubes supply flat shelving for fabrics, drawers in two depths. Shallow ones are excellent for keeping small items separate and accessible.

3808352671

Cube combinations can be stacked to any desired height. If grouping will be free-standing, look for system that provides clips, pegs, or other means of holding the cubes together.

3808352491

Work table of components is just one example of the many possibilities offered by combinations of separate parts. The top could be a flush door, a plastic-laminated slab, a rectangle of plywood; it could also be purchased large enough for cutting . . . . The storage units could also vary: both sides instead of one; stacked cubes as shown, a desk-type pedestal, or a modular base unit . . . .

Friday, July 31, 2009

The many, many faces of Itso cubes

I hadn’t planned on this being the next stop on my sewing room series, but Itso storage cubes and the bins, casters, and other bits are on sale at Target through tomorrow, so the time is now! I’ve fallen hard for the system—it’s well suited for quilting stuff, and it’s quite customizable even beyond the officially offered accessories. Read on!

3776700604

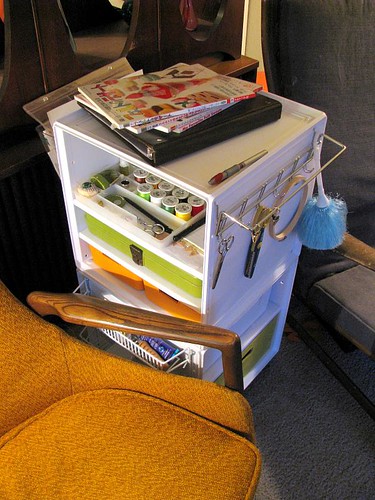
I do a lot of appliqué, felt sewing, and other handwork in front of the tube, so this first little number is actually a satellite to my actual sewing room. To corral all the threads and notions that were accumulating next to the chair Felis Domesticus and I fight over, I wanted a Sonne taboret-ish thing from Ikea—quite useful for sewing, it seems—but alas it’s been discontinued. So I built a similar something from the Itso cubes, with bins for felt, flosses, and such. The hooks with the scissors, embroidery hoop, and, mysteriously, a feather duster are part of a towel bar attached with pegboard hooks through the predrilled holes of the cube. A spice rack was attached the same way to add a few small shelves (mostly obscured by the chair), as was a wall file bin on the back, great for the patterns, magazines, and books that always pile up. But the whole thing was a little too tall to be practical, so I consolidated…

3776700672

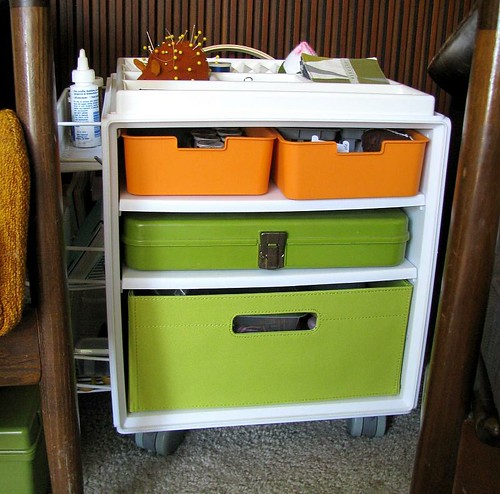
The green box on the middle shelf is a vintage Wil-Hold thread box (one of many I’ve scavenged) that holds my hand-appliqué thread; I was delighted that it slid into the cube so smashingly. The big bin on the bottom still holds felt for when that urge strikes, but it can be easily swapped out for other project boxes.

3775894143

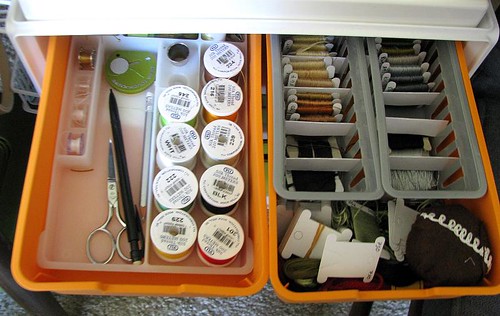
The tray wedged into the orange bin on the left holds my main handwork tools and threads pulled for projects in progress; when I’m taking hand-sewing on the go, the tray goes back into the Wil-Hold box sewing box from whence it came. Embroidery flosses are in the other orange bin.

3775894123

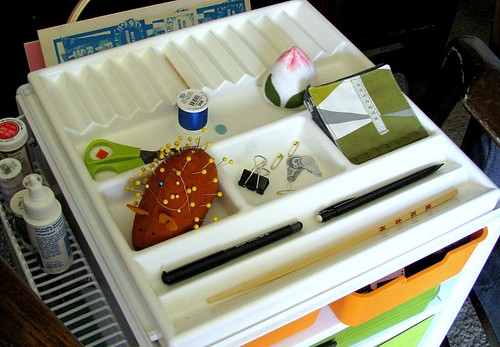
Packs of Anordna cosmetic trays were deeply discounted on our last Ikea trip; while they’re too wide as-is to slide into the cubes, this one nestles nicely on top with places for a pincushion, marking tools, and anything I need at hand. Eventually perhaps I’ll come up with something impossibly clever to do with the lipstick holders. (Take up drag and fill it with lipsticks? Too pedestrian.)

Now, moving into the sewing room proper…

3775894173

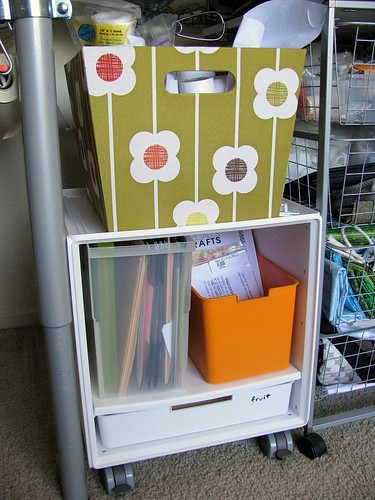
When the Handwork Trolley Mark I came apart, this is where the top cube went—under my cutting table (more on that in a future post). The square Itso bins, as on the bottom here, are perfect for 12-inch quilt blocks, with ample room even with seam allowances included. So each quilt gets a block box; this one is the one I’m working on now, handy for reference at the cutting table (raw fabric for projects in progress are in the wire bins at the edge of the photo). The file box holds patterns printed from the PC and templates in folders, while the orange bin is perfectly sized for commercial quilt patterns. It’s a slightly tighter fit for sewing-pattern envelopes or oversized quilting patterns, but the 6-by-9-inch ziplock baggies work great. I don’t keep all my project files here, but I love being able to pull the file or pattern I’m working on without leaving the cutting table. The Orla Kiely box on top holds spray adhesives, interfacings, and small rolls of fusible web, also handy to have accessible at the cutting station.

3775894223

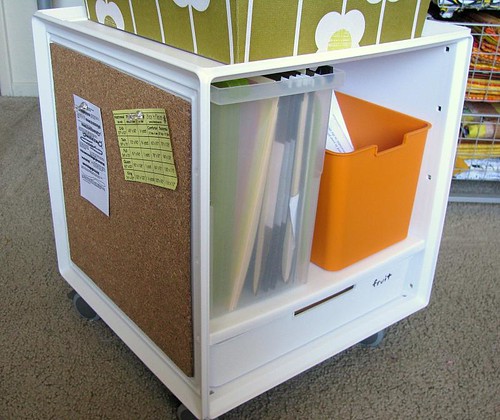
A 12-inch cork square fits right into any side of the cubes, so there’s a small bulletin board on the cutting table cube, too. I’ve infected the Other with this Itso sickness; he likes putting the cork on the top of the cubes to make a nonskid surface.

3776700978

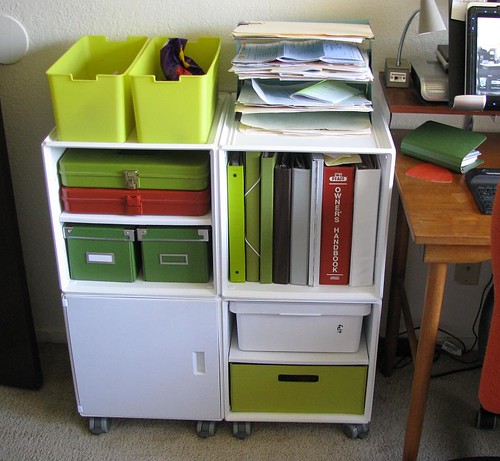
This final arrangement of cubes is next to my desk, hence the messy stack of files. One cube holds reference binders for quilting, sewing, and my sewing machine; the bins and boxes hold more felt and office junk. The two thread boxes are—gasp!—empty, so they can’t really justify the space they’re taking and may have to move along. Also not fully used are the two green bins up top, but that’s because they’re waiting for inventory for my forthcoming pattern line! I haven’t felt compelled to make any dry-erase notes on the cupboard door, though Target assures me that’s what it’s for.

3775894367

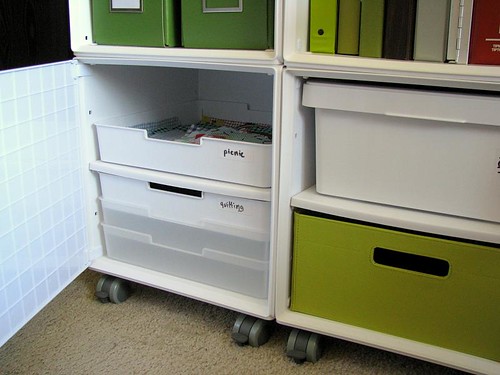
Behind the door are more block boxes. The shelves, at $4.99 each without a sale, are the hidden killer in the cost of all this Itso stuff, so take note that an empty cube, or one with a single shelf, will hold six block boxes, while putting the max of three shelves in will hold only four boxes and cost a lot more! That is, as long as you don’t mind them nestling into one another.

So, do I seem nuts yet? I think of organizing as a hobby, which is why my sewing room is always messier than these tidy storage units make it look. If you suffer from a similar dysfunction, I hope you’ve picked up a few ideas. And if you’ve read this far, I thank you with a gratuitous photo of Miss Fluffenstuff.

3776700922

Monday, July 20, 2009

How to make a portable ironing station

Spring cleaning season may be over, but organizing is a year-long battle. I’m finally starting to get my sewing room/office into a shape I like, so this post is the first in a series on furniture hacks, storage ideas, vintage sewing space eye candy, and other stuff on creating a craft space. I love seeing these types of posts on other people’s blogs, so I hope you’ll get some ideas here too!

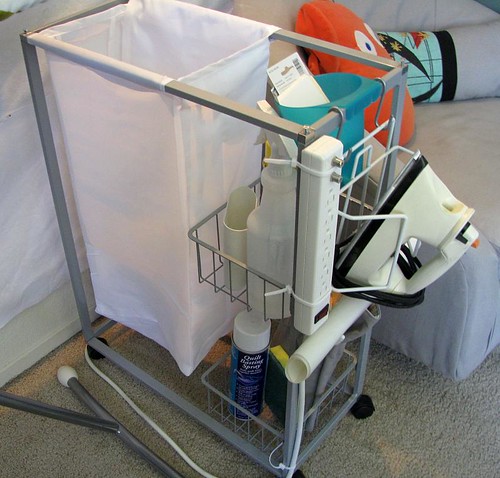
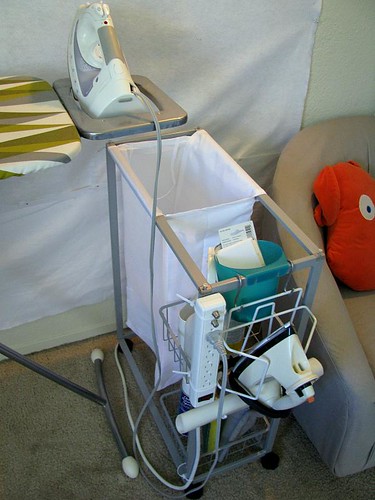
portable ironing station

When I started quilting, an iron and a board to use it on (now deceased) were all I needed. But the tools quickly accumulated—spray starch, pressing cloths, water bottles, iron cleaner, and so on. Never mind that I now use three different irons for distinct purposes. The sensible place to store such things is near where one irons, but one doesn’t always iron in a place with ample storage. This book points out that a conventional ironing board wastes space compared to, say, some cupboards with a pressing surface on top. Agreed, but the layout of my sewing room necessitates that the ironing board live in front of the design wall, so I want it portable enough to move easily when I’m laying out a big quilt on the wall. An Ikea hack keeps all my pressing accoutrements near my iron—and lets me easily move them to a secondary pressing surface near my sewing machine.

The base of my ironing trolley is Ikea’s Antonius laundry bag with stand, with casters added. The baskets on the stand fit spray bottles and other bits and bobs, and fabric waiting to be pressed goes in the laundry bag rather than into a big heap on my floor. I’m looking for a water bottle with some sort of nozzle that would fit in one of the baskets so I wouldn’t have to run to the sink so often when the iron runs out of steam.

iron plugs into power strip for easy access

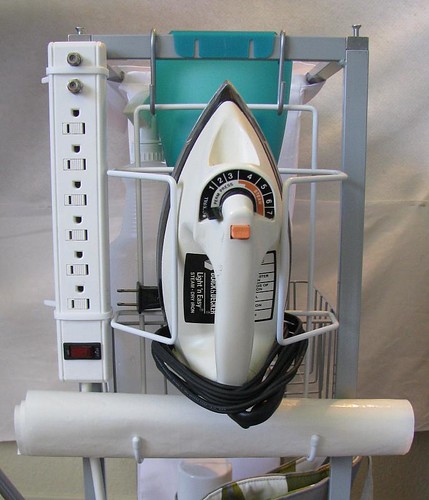
Using a couple cable ties from Montera (a set of various cable clips and ties from Ikea; can’t find it on their site), I attached a power strip to one of the uprights so I can turn the iron on and off with a flick of a (lighted) switch rather than reaching awkwardly round furniture to unplug it. A couple self-stick nonslip pads on the back of the strip help keep it from sliding down. Someday I may come up with some more permanent hardware to mount the power strip, but this works for now. It helps to use a strip with a reasonably long cord so you can mount it on the front of the cart and still run the cord to the back.

ironing-board holder houses iron and pressing sheet

My primary iron lives in the in the iron rest on the ironing board, and the board is rarely put away, so this door-mounted rack for both iron and board wasn’t getting much use. I hung it from the end of the Antonius cart using a couple Bygel S-hooks, and now I keep my fusible-only iron there, along with a Teflon pressing sheet rolled up in the hooks meant to hold the ironing board. A cup (meant to hang on a rail; also apparently not on the Ikea site) facing the other way keeps the hooks from sliding together and gives a place for smaller stuff, like bias-tape makers and tubes of iron cleaner.

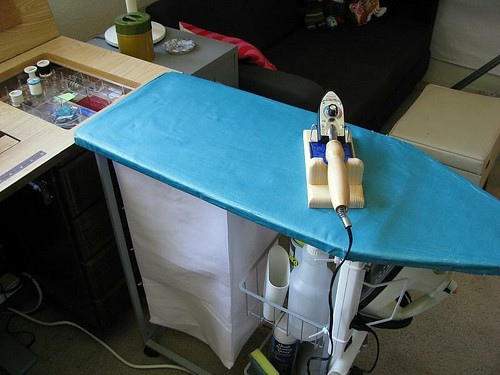
with removable pressing surface

As I mentioned, the whole thing unplugs, rolls over to my sewing machine, and becomes a secondary pressing surface at (more or less) sitting height by topping the unit with a mini ironing board. The corners of Antonius have holes for screws; after much fiddling about at the hardware store, I determined that they take size 10-32 screws. I put one in each hole, letting them stick out about ½" (you can see them sticking out two photos up). Then I measured the center-to-center distances between them (a 52.5cm × 23cm rectangle—it’s Ikea, so metric gives prettier numbers!) and made corresponding marks on the bottom of the ironing board. Mine was made from particle board, so I drilled holes big enough for the screw heads at each mark, about ¼" deep. Shake the sawdust out, line up the screw heads with the holes, and set it on the Antonius frame—it’s secure enough to iron on (using the mini iron I keep in the bottom basket) but still lifts off easily when it’s time to roll the trolley back to the main ironing board. I’m thinking about rigging up some hooks on the back of the unit to hang the mini ironing board from when it’s not in use; for now, I just stick it behind my sewing table.

I didn’t have any of this in mind when I bought the laundry stand, but now I use it with the mini board almost more than my real ironing board, since it means I can just swivel my chair from sewing to pressing.

Stay tuned for more sewing-oriented Ikea hacks!

Monday, April 07, 2008

More pegboard love

fusible web, meet curtain rod

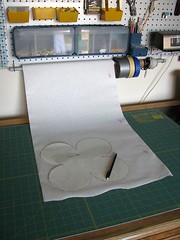
I've written previously about how much I love my pegboard, and the marvel of modern home organization continues to delight me as I tweak its configuration. Lately I've been doing a lot of fusible web appliqué as described in the excellent Stitched Raw Edge Appliqué, and I kept having to toss my roll of fusible web off the table to make cutting space—only to chase after the roll when I then needed another chunk of web. Now it's on the curtain rod hung from the bottom of my pegboard, so I just yank as much as I need onto the table, trace the template onto the paper side (which faces up as it comes off the roll), cut it out, and the roll stays put. And all my pencils and cutting tools are right there for trimming the template. In the book, Sue Nickels and Pat Holly recommend cutting the inside of the fusible templates out with embroidery scissors (essentially making a ring of webbing), but I find the X-Acto knife also stowed on my pegboard is quicker for removing the innards.
Thursday, January 31, 2008

Happy birthday to the Father!

The Mother gets a lot of play round these parts, mainly because her interests align with mine so well. But any creativity I may have comes from both of my parents. The Father definitely has a creative streak, which sometimes brings out his inner engineer in bizarre ways.

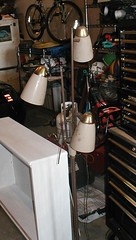
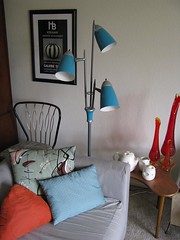
For instance, what makes this lamp sparkle in the "after" photo?


None other than automotive engine paint. You might think it's just for jazzing up the V8, but not the Father. When he saw the under-$10 lamp the Mother had found for me at a junk shop, he knew it needed a paint job (that was obvious), but he also knew regular spray paint wouldn't stand up to the heat of the bulbs sizzling in metal shades. Ugly as the "before" version was, I didn't think there was any way to keep the detail of it—the lamp had three colours, including one metallic, and that sounded like a royal pain to repaint. But the Father disassembled the whole thing, sandblasted the hell out of each part (or maybe sanded them? At any rate, each piece was smooth as new), primed everything, and then sprayed each piece individually in one of three colours of engine paint. For the silver metallic, he even taped off rings in the center bit of the neck (where the three arms meet) to do detail work that not only replicated the original colour scheme but also added new detail! I couldn't believe it. If you look closely, you can catch lamps just like this (sometimes with different shades) on TV-show sets or at flea markets, but I've never seen one look this good, especially considering the deal we got on it (we probably spent more on paint than on the actual lamp!).

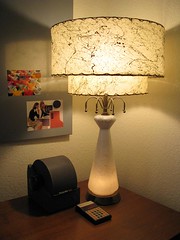
In the same vein, the Father was also responsible for repairing this lamp from an antique mall in Ohio. See how the base lights up as well as the shade?

a feat of engineering

We only discovered that it did this after buying it, but the base wasn't working. So the Father disassembled the whole thing again and determined that it must be a three-way socket running the show. He eventually figured out how to jury-rig a new socket—I distinctly remember him snapping off bits of it in mad scientist fashion—so the switch would turn on the base, the shade, or both in sequence. I don't know how he did it, but it's pretty impressive. And he was giddily impressed with his own handiwork, as I recall.

Happy birthday, the Father! You're the greatest.

PS—I'll stop bragging about my family now. I promise.

Wednesday, November 21, 2007

Christmas comes early

The thrift store gods continue to smile upon us—look what the Other spotted at our favourite shop this morning!

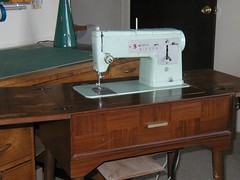
vintage sewing machine and table

Are those taper legs? Yes! Is the stain a perfect match for this desk? Yes! Is the sewing machine that retro shade of aqua that I find so luscious? A thousand times yes!

While the table's not crucial furniture, I think I can modify the table to fit Gertrude, my more modern sewing machine, which would give me a nice flat surface. Gertrude's no looker, but she probably has to stay my workhorse machine.

vintage sewing machine (closer)

On the other hand, the old Singer seems to work—I need to play with it a bit more—and it has such a big throat that I wonder if it might prove useful as well as lovely. And even if lovely turns out to be the Singer's only real quality, I think she's mighty cute.

So now I'm off to scour the Internet for a manual, clean her up a bit, and see what she can do.

Friday, November 02, 2007

Sewing-room saviour: pegboard!

sewing room pegboard

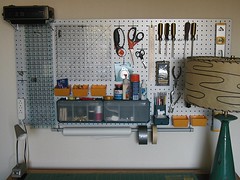
Having a space to house all my sewing and quilting supplies continues to delight, particularly with the recent addition of a pegboard. Simply getting quilting rulers out from under foot was enough to make me fall in love, and I've always had an affection for modular and reconfigurable storage. Plus, the board's silvery colour was a perfect match for the magnetic panels I have over my desk on the other side of the room. If you're interested, click the photo above for some labels. A few highlights that make me especially giddy:
  • The pencil holder, built specifically for pegboards, has a built-in pencil sharpener! Perfect for fabric-marking pencils, since my sharpener always seems to go walkabout.
  • I've always wanted plug sockets up high on the wall so I don't have to bend down to plug in my iron all the time. Now I've got 'em, and I can use the strip on the pegboard for a lightbox, hot glue gun, or anything else I might need near my cutting table.
  • ReadyMade number 29 had some pegboard ideas, including the curtain-rod rail I've used here. They suggested it for tape, ribbon, and wire, but it's also a great place to keep that perennial quilters' favourite, freezer paper.
And then, of course, there's the more typical pegboard occupants like screwdrivers and a level. OK, enough swooning.

Thursday, October 18, 2007

Tutorial: cover for Ikea ironing board

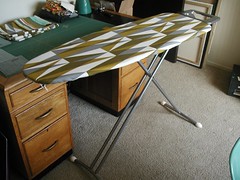
recovered ironing board

Given the disastrous death of my previous ironing board, a replacement was necessary. But Ikea's Dänka comes with the gross scribbly flower cover shown at left, which would clearly be bullied by the other decor of my burgeoning sewing room/office. So using some green and grey Pernilla fabric that will match the eventual curtains, I threw together a simple new cover using the existing one as a pattern. Here's how, in case anybody else is similarly turned off by the default cover. (And trust me! The steps look long, but it really is pretty simple.)

Materials:
  • Dänka ironing board
  • 1 1/2 yds (1.5m) cotton fabric, such as Pernilla (there will be lots of excess, but if the pattern runs up the bolt, you'll need this much)
  • Straight pins
  • Clear acrylic ruler
  • Pencil or fabric chalk (a regular pencil is fine; the marks will be hidden in the seam allowance)
  • Scissors
  • Sewing machine
  • Thread
  • Safety pin

Instructions:
  1. Untie the string holding the cover to the ironing board. Pull the string out of the cover and set the string aside. Remove the cover from the board, leaving the padding in place.
  2. Use the old cover as a pattern for the new one: Place the cover flat on the right side of the fabric, allowing 1 inch (2.5cm) all the way around for seams. Pin the cover to the fabric every few inches along the perimeter, smoothing the cover as you go to keep it flat.
  3. Mark the seam allowance around the old cover: Use the ruler and pencil or chalk to mark 1 inch (2.5cm) from the old cover all the way around the "pattern". When turning corners, make short marks and move the ruler frequently.
  4. Cut the fabric out along the marked line. Do not unpin it from the old cover.
  5. Turn the old cover and fabric over so the wrong side of the fabric faces you. Snip into the seam allowance, almost 1 inch (2.5cm), at the tip of the arm (at the same place where the string ends came out of the old cover). Zigzag stitch along the edges and end of the snip to prevent fraying.
  6. Fold a double hem for the cord channel: Remove a pin and fold 1/2 inch (1.25cm) of the fabric edge in, then fold that edge in another 1/2 inch (1.25cm). The outside fold should line up with the edge of the old cover beneath. Repin the hem, catching only the new fabric. Repeat around the perimeter of the cover. There will be extra fabric bulk in the curves or the seam allowance—a pro seamstress/seamster would make them nice and neat, but since the channel gets cinched by the cord anyway, I just flattened out the folds as best I could. Chuck out the nasty old cover or save it for future pattern use.
  7. Sew the channel: Starting and the snip made in Step 5, sew a straight stitch close to the fold of the hem, removing pins as you go. Adjust the bulk around curves as necessary.
  8. Insert the cord: Tie the string to the safety pin. Insert the pin into one end of the channel and work it through to the other end. You'll periodically need to slide the cinches onto the loose end of the string. When finished, you should have a roughly equal amount of string on each side of the channel opening.
  9. Fit the new cover around the board: Place the cover on the ironing board, keeping the padding that came with the board in place. If the cover got wrinkled when inserting the string, iron it now. Use something flat to push the end of the cover through the small space between the end of the board and the iron holder. Arrange the cover so there is a roughly even amount of material around all the edges, again making sure the padding stays in place. Pull the string to cinch the cover around the board. Tie the ends of the string a few times to secure.

All the pinning and whatnot takes some time, but the finished product will make me much less cranky while ironing.

If you're looking to sew a completely new cover (that is, with fresh padding and everything), try the instructions on The Purl Bee.