Pages

Thursday, December 24, 2009

Had to run—and have to run again!

Usually when my blog posting goes quiet it’s ’cause I’ve got busy, lazy, or some combination of the two. But this time there’s an actual, real reason. On November 11, fellow crafter/sewer Youngest Brother was in a serious car accident and has been recovering from a brain injury ever since. To spare all the gory details, let’s skip from there to the present: he’s came out of inpatient rehab yesterday! He’s walking, talking, eating, and joking, and continued outpatient rehab should help with some remaining memory and strength issues, but we’ve been told to expect a pretty full recovery. It’s an incredible turnaround considering the initial prognosis and really gives us something to celebrate this Christmas. The Other and I are flying out there again today to join Middle Brother, his wife, the Mother, and the Father, so we’ll all be able to celebrate together.

In the meantime, there’s lots to catch up on here, so I’ll try to post as I can. But we’re finally moving out of this cruddy apartment and into a house in January, so it’ll still be busy!

I hope you all have a happy and especially a safe holiday season. Am at the airport, so have to dash!

Tuesday, November 03, 2009

How to not get your binding backwards

4073701459

Can’t show you more of this quilt yet ’cause it’s for a quilt-shop challenge that’s meant to be anonymous (and who knows who might be reading...you know, aside from the Mother), but why this shot of a seam in the binding?

Well. I’ve been quilting for several years, but there’s one basic task that has eluded me: I’ve consistently joined the two ends of quilt binding backwards. And it’s not because I’m too macho to read the instructions—far from it. Every single time, I look up the process in my go-to quilting manual and in any number of other books, information sheets, PDFs, and what have you, and I could swear I’m following the pictures and the instructions properly, but every single time, I manage to join the ends with a twist so they won’t lay flat on the quilt. Much cursing ensues, followed by a brief, begrudging communion with the seam ripper and much mental backtracking to figure out what I did wrong. Usually I’d think to myself, OK, if what feels right is actually wrong, then what feels wrong must be right. But had I thought that on the first go? I’d tear my hair out if I had any left.

I’ve managed to get it right the first time on the last two or three quilts I’ve bound, though. How? I’m not quite sure. All I know is that QuiltWoman.com’s Endless Binding instructions [PDF from here] contains diagrams that somehow get through my thick skull. I skip right to the “Joining Final Ends of Binding Strips” section, follow the picture, and the binding comes out right. I’m not sure why this version works for me (maybe the labels?) while no other has, but thank you, Ann Anderson.

Maybe I’m the only person with this particular deficiency, but if you share it, perhaps those instructions will keep you untwisted as well. And then you too can bind without a seam ripper!

Thursday, October 15, 2009

Flower Patch quilt

Flower Patch quilt

More Fast and Fabulous Quilting Ideas OK, let’s not dwell on the bad. There’s more good news! Remember the quilt blocks that looked like but actually weren’t inspired by this thrifted tablecloth? Well, the quilt’s all together, and you can make your own version with the pattern in APQ’s More Fast & Fabulous Quilting Ideas! (They call it Flower Power; I say Flower Patch. Tomaydo, tomahto.)

Flower Patch quilt

The super quilting was done by Jeanette Lopes at Sew Central QuiltWorks—many of the fabrics came from the same place. If you’re in California’s Central Valley, be sure to stop in and say hi, pick up some fun fabric, or bring a quilt top by for quilting—or if you’re really feeling like treating yourself, they sell Gammill longarm quilting machines, too. (They have a booth at PIQF if you’re there now.) While they do lovely traditional quilting work, they also have quilted samples in the shop that are closer to my bright, modern look, so I knew they’d do a great job. Thanks so much Jeanette!

Flower Patch quilt

(Yes, I know the lighting is hideously uneven—this was the best I could do while balanced precariously on my office chair…)

Perils of the freelance life

newtracktrash_200

Stitch was the good news. But there’s bad news, too. I used to be a regular contributor of articles to Quilter’s Home magazine, and several of those articles were stolen.

Many of the articles you read in the magazine over the past year, by me and other writers, were never paid for. Since the magazine’s former parent company, CK Media, was bought out by New Track Media’s Creative Crafts Group, many unpaid invoices have ended up in the hinterland. CCG insists the debts are CK’s problem, while CK really doesn’t exist anymore and what’s left of it is unresponsive—so the magazines can carry on publishing, with debts to contributors vanishing into thin air.

On top of it all, one of my articles is up on the QH website, though I never licensed it for electronic publication, and so far requests to have it removed have got me nowhere.

Freelancers have a hard enough time scraping together a living when our invoices are paid. When they’re not, we have to waste more (unbillable) time chasing them, explaining the situation repeatedly to editors who neither created the problem nor have much power to fix it. Freelance budgets are often the first cut in bad economic times, so I was really counting on the money I had already earned coming through.

Mark Lipinski himself has left the company, so will Quilter’s Home continue at all? Given the uncertain future of the magazine, I strongly recommend you not renew QH if your subscription is ending—you could be paying for something that won’t exist.

Furthermore, I won’t be buying or subscribing to any titles published by Creative Crafts Group. Perhaps you’ll consider doing the same in support of the contributors—writers, designers, photographers—who provided content to the magazines, who made them something you’d want to buy, but who have not been compensated for their work. This means no more Quilter’s Newsletter for me, nor McCall’s Quilting and Quick Quilts, Quiltmaker, Fons and Porter, Sew Simple, Sew News, and on and on… This cuts off a huge segment of the craft magazine market, giving me fewer places to sell articles and designs, but I can’t afford to work for nothing. If you’re a designer or writer, be very cautious submitting to these magazines.

Not all magazines are like this. The Better Homes and Gardens quilting magazines, American Patchwork & Quilting and Quilts & More, have always paid me promptly, as has Interweave’s Stitch. They’re better magazines too—better written, better edited, better designed, printed on better paper, and clearly more professional. So support the good guys.

Tuesday, October 13, 2009

Pillows and wallet pattern in Stitch

Stitch, Fall 09 The extra-big Fall issue of Stitch is now on newsstands with heaps of fun projects! I’m about to curl up with a cup of tea (it’s the first chilly, rainy day of the season) and spend some time with the magazine, but first I wanted to show you my projects from it.

4009737062

4008970821

4009736984

Inspired by the sculptural pillows in vastly overpriced designer shops, this trio of cushions uses slashed felt in three different ways for unique textures, with punches of color showing through the slashes.

4009736844

I picked up most of these silk necktie-fabric scraps at PIQF last year (coming up this year at the end of the week!) and wasn’t sure what to do with them until this wallet occurred to me. The front cover is made of foundation-pieced strips, and inside there’s room for business cards and a couple USB flash drives—everything you need to take a super-barebones office on the road in your pocket.

4008970359

Silk’s of course not my usual material of choice, but it was a nice change from the quilting cottons—even though I was petrified of ruining the fabric with moisture from the iron. It wasn’t nearly as scary as I’d imagined, though.

Check out Stitch for these and more projects! Now off to get the kettle boiling…

Tuesday, September 29, 2009

Birds in the breeze

3966851230

My Bird Crossing quilt spent the weekend in good company at the Quilting in the Garden show at Alden Lane Nursery in Livermore—right next to a quilt by Laura Wasilowski! The outdoor quilt show is always a nice day out; the nursery really thinks about how to arrange the quilts so that they complement each other instead of clashing. Blowing in the breeze under natural light is really a better way to see quilts than under the fluorescent lights of a rented auditorium.

3966076239

Bird Crossing pillow The show also marked the debut of my pattern for Bird Crossing, which includes a bonus pattern for a brand-new, never-before-published pillow. If you’d like a copy, they’re in stock at In Between Stitches in Livermore, or ask at your local quilt shop (any interested retailers can contact orders[at]feeddog[dot]net for details). Or you can download a PDF version of the pattern for US$7.50 from the shop on my website and get sewing right now! Either way, you’ll get complete, illustrated instructions for hand-look machine appliqué using invisible thread, full-size templates for the birds (to print at home if buying the digital version), and the pillow pattern.

This is the first Feed Dog Designs quilt pattern available, though there are more on the way—just last week I taught Slash/Backslash (finished pictures coming soon!) at my guild, and it’s on its way too, along with more fun appliqué projects. So stay tuned!

(See a few more photos from the Quilting in the Garden in my Flickr set.)

Thursday, August 27, 2009

Amy Butler Softwares review

Amy Butler Softwares cover Head over to True Up to read my review of Electric Quilt’s Amy Butler Softwares pattern program! Kim gave me the chance to play around with the software, and one of the test projects I made was the Pinwheel Pillow—shown here as commandeered by Princess Fluffinstuff.

Her Highness on her dais

Monday, August 10, 2009

Vintage Sewing Rooms: storage cubes

Using cubes for storage in sewing rooms is nothing new—here’re some configuration ideas from the 1976 Reader’s Digest Complete Guide to Sewing.

3808352281

Long, low arrangement provides bin, shelf, and drawer storage, stand-up slots for books or patterns. Tops make a convenient surface for sorting and selecting.

3808352571

Stacked cubes supply flat shelving for fabrics, drawers in two depths. Shallow ones are excellent for keeping small items separate and accessible.

3808352671

Cube combinations can be stacked to any desired height. If grouping will be free-standing, look for system that provides clips, pegs, or other means of holding the cubes together.

3808352491

Work table of components is just one example of the many possibilities offered by combinations of separate parts. The top could be a flush door, a plastic-laminated slab, a rectangle of plywood; it could also be purchased large enough for cutting . . . . The storage units could also vary: both sides instead of one; stacked cubes as shown, a desk-type pedestal, or a modular base unit . . . .

Friday, July 31, 2009

The many, many faces of Itso cubes

I hadn’t planned on this being the next stop on my sewing room series, but Itso storage cubes and the bins, casters, and other bits are on sale at Target through tomorrow, so the time is now! I’ve fallen hard for the system—it’s well suited for quilting stuff, and it’s quite customizable even beyond the officially offered accessories. Read on!

3776700604

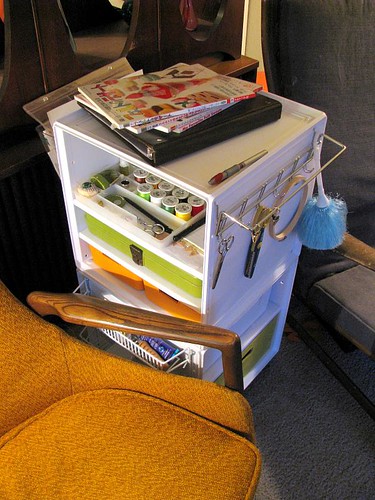
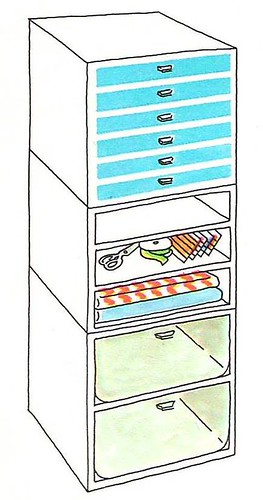
I do a lot of appliqué, felt sewing, and other handwork in front of the tube, so this first little number is actually a satellite to my actual sewing room. To corral all the threads and notions that were accumulating next to the chair Felis Domesticus and I fight over, I wanted a Sonne taboret-ish thing from Ikea—quite useful for sewing, it seems—but alas it’s been discontinued. So I built a similar something from the Itso cubes, with bins for felt, flosses, and such. The hooks with the scissors, embroidery hoop, and, mysteriously, a feather duster are part of a towel bar attached with pegboard hooks through the predrilled holes of the cube. A spice rack was attached the same way to add a few small shelves (mostly obscured by the chair), as was a wall file bin on the back, great for the patterns, magazines, and books that always pile up. But the whole thing was a little too tall to be practical, so I consolidated…

3776700672

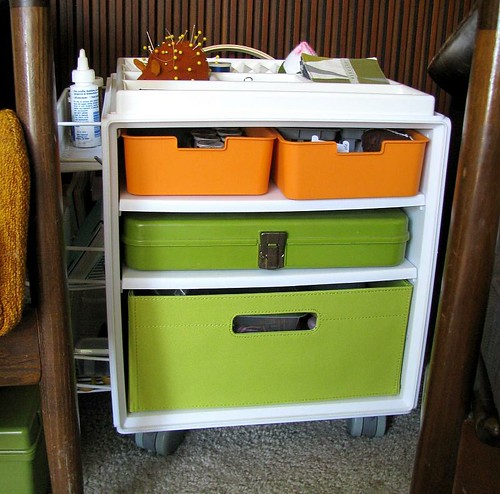
The green box on the middle shelf is a vintage Wil-Hold thread box (one of many I’ve scavenged) that holds my hand-appliqué thread; I was delighted that it slid into the cube so smashingly. The big bin on the bottom still holds felt for when that urge strikes, but it can be easily swapped out for other project boxes.

3775894143

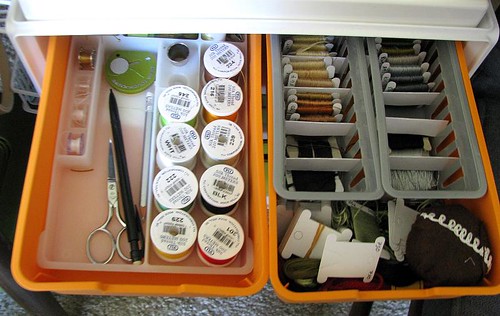
The tray wedged into the orange bin on the left holds my main handwork tools and threads pulled for projects in progress; when I’m taking hand-sewing on the go, the tray goes back into the Wil-Hold box sewing box from whence it came. Embroidery flosses are in the other orange bin.

3775894123

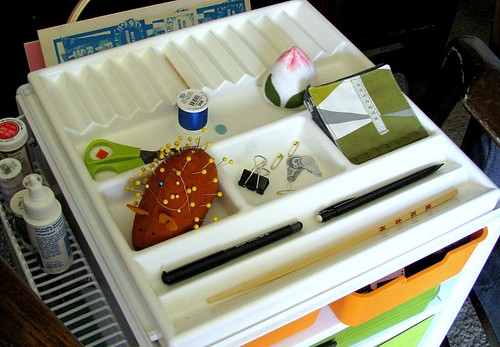
Packs of Anordna cosmetic trays were deeply discounted on our last Ikea trip; while they’re too wide as-is to slide into the cubes, this one nestles nicely on top with places for a pincushion, marking tools, and anything I need at hand. Eventually perhaps I’ll come up with something impossibly clever to do with the lipstick holders. (Take up drag and fill it with lipsticks? Too pedestrian.)

Now, moving into the sewing room proper…

3775894173

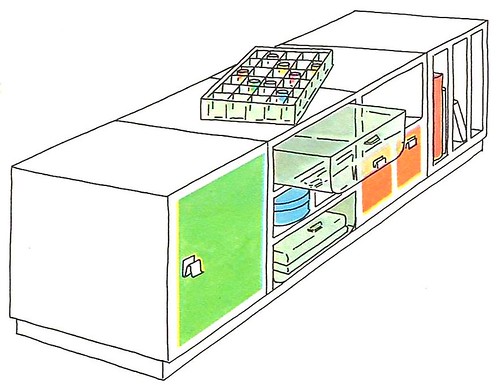
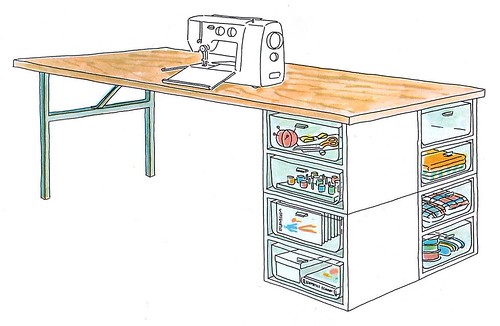
When the Handwork Trolley Mark I came apart, this is where the top cube went—under my cutting table (more on that in a future post). The square Itso bins, as on the bottom here, are perfect for 12-inch quilt blocks, with ample room even with seam allowances included. So each quilt gets a block box; this one is the one I’m working on now, handy for reference at the cutting table (raw fabric for projects in progress are in the wire bins at the edge of the photo). The file box holds patterns printed from the PC and templates in folders, while the orange bin is perfectly sized for commercial quilt patterns. It’s a slightly tighter fit for sewing-pattern envelopes or oversized quilting patterns, but the 6-by-9-inch ziplock baggies work great. I don’t keep all my project files here, but I love being able to pull the file or pattern I’m working on without leaving the cutting table. The Orla Kiely box on top holds spray adhesives, interfacings, and small rolls of fusible web, also handy to have accessible at the cutting station.

3775894223

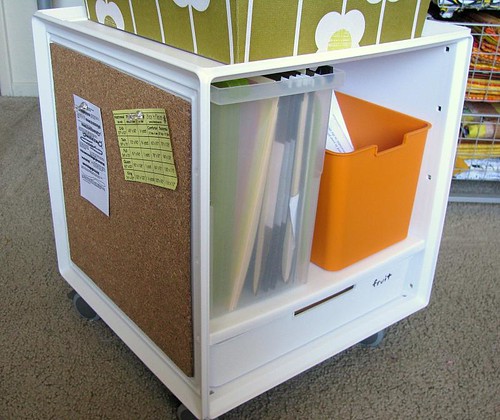
A 12-inch cork square fits right into any side of the cubes, so there’s a small bulletin board on the cutting table cube, too. I’ve infected the Other with this Itso sickness; he likes putting the cork on the top of the cubes to make a nonskid surface.

3776700978

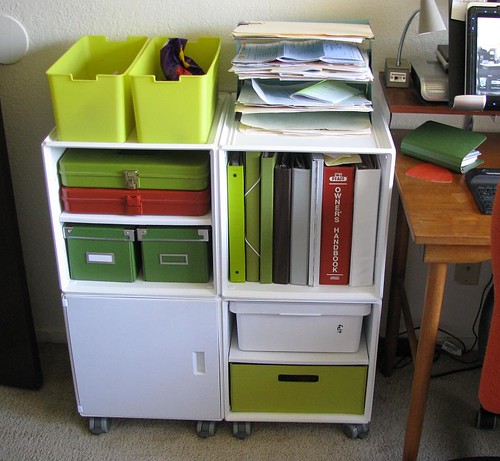
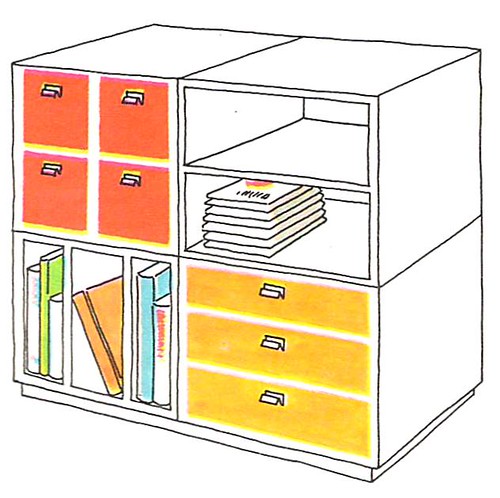
This final arrangement of cubes is next to my desk, hence the messy stack of files. One cube holds reference binders for quilting, sewing, and my sewing machine; the bins and boxes hold more felt and office junk. The two thread boxes are—gasp!—empty, so they can’t really justify the space they’re taking and may have to move along. Also not fully used are the two green bins up top, but that’s because they’re waiting for inventory for my forthcoming pattern line! I haven’t felt compelled to make any dry-erase notes on the cupboard door, though Target assures me that’s what it’s for.

3775894367

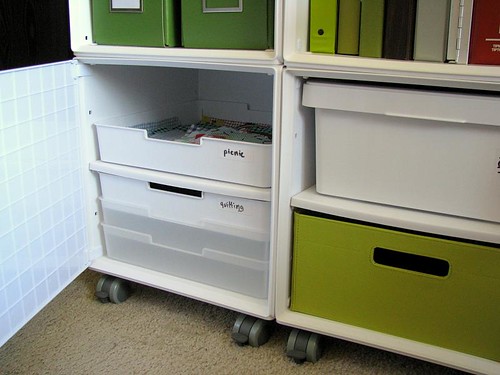
Behind the door are more block boxes. The shelves, at $4.99 each without a sale, are the hidden killer in the cost of all this Itso stuff, so take note that an empty cube, or one with a single shelf, will hold six block boxes, while putting the max of three shelves in will hold only four boxes and cost a lot more! That is, as long as you don’t mind them nestling into one another.

So, do I seem nuts yet? I think of organizing as a hobby, which is why my sewing room is always messier than these tidy storage units make it look. If you suffer from a similar dysfunction, I hope you’ve picked up a few ideas. And if you’ve read this far, I thank you with a gratuitous photo of Miss Fluffenstuff.

3776700922

Monday, July 20, 2009

How to make a portable ironing station

Spring cleaning season may be over, but organizing is a year-long battle. I’m finally starting to get my sewing room/office into a shape I like, so this post is the first in a series on furniture hacks, storage ideas, vintage sewing space eye candy, and other stuff on creating a craft space. I love seeing these types of posts on other people’s blogs, so I hope you’ll get some ideas here too!

portable ironing station

When I started quilting, an iron and a board to use it on (now deceased) were all I needed. But the tools quickly accumulated—spray starch, pressing cloths, water bottles, iron cleaner, and so on. Never mind that I now use three different irons for distinct purposes. The sensible place to store such things is near where one irons, but one doesn’t always iron in a place with ample storage. This book points out that a conventional ironing board wastes space compared to, say, some cupboards with a pressing surface on top. Agreed, but the layout of my sewing room necessitates that the ironing board live in front of the design wall, so I want it portable enough to move easily when I’m laying out a big quilt on the wall. An Ikea hack keeps all my pressing accoutrements near my iron—and lets me easily move them to a secondary pressing surface near my sewing machine.

The base of my ironing trolley is Ikea’s Antonius laundry bag with stand, with casters added. The baskets on the stand fit spray bottles and other bits and bobs, and fabric waiting to be pressed goes in the laundry bag rather than into a big heap on my floor. I’m looking for a water bottle with some sort of nozzle that would fit in one of the baskets so I wouldn’t have to run to the sink so often when the iron runs out of steam.

iron plugs into power strip for easy access

Using a couple cable ties from Montera (a set of various cable clips and ties from Ikea; can’t find it on their site), I attached a power strip to one of the uprights so I can turn the iron on and off with a flick of a (lighted) switch rather than reaching awkwardly round furniture to unplug it. A couple self-stick nonslip pads on the back of the strip help keep it from sliding down. Someday I may come up with some more permanent hardware to mount the power strip, but this works for now. It helps to use a strip with a reasonably long cord so you can mount it on the front of the cart and still run the cord to the back.

ironing-board holder houses iron and pressing sheet

My primary iron lives in the in the iron rest on the ironing board, and the board is rarely put away, so this door-mounted rack for both iron and board wasn’t getting much use. I hung it from the end of the Antonius cart using a couple Bygel S-hooks, and now I keep my fusible-only iron there, along with a Teflon pressing sheet rolled up in the hooks meant to hold the ironing board. A cup (meant to hang on a rail; also apparently not on the Ikea site) facing the other way keeps the hooks from sliding together and gives a place for smaller stuff, like bias-tape makers and tubes of iron cleaner.

with removable pressing surface

As I mentioned, the whole thing unplugs, rolls over to my sewing machine, and becomes a secondary pressing surface at (more or less) sitting height by topping the unit with a mini ironing board. The corners of Antonius have holes for screws; after much fiddling about at the hardware store, I determined that they take size 10-32 screws. I put one in each hole, letting them stick out about ½" (you can see them sticking out two photos up). Then I measured the center-to-center distances between them (a 52.5cm × 23cm rectangle—it’s Ikea, so metric gives prettier numbers!) and made corresponding marks on the bottom of the ironing board. Mine was made from particle board, so I drilled holes big enough for the screw heads at each mark, about ¼" deep. Shake the sawdust out, line up the screw heads with the holes, and set it on the Antonius frame—it’s secure enough to iron on (using the mini iron I keep in the bottom basket) but still lifts off easily when it’s time to roll the trolley back to the main ironing board. I’m thinking about rigging up some hooks on the back of the unit to hang the mini ironing board from when it’s not in use; for now, I just stick it behind my sewing table.

I didn’t have any of this in mind when I bought the laundry stand, but now I use it with the mini board almost more than my real ironing board, since it means I can just swivel my chair from sewing to pressing.

Stay tuned for more sewing-oriented Ikea hacks!

Tuesday, July 14, 2009

Round the web with EQ

I was thrilled when Kim Kight of the incomparable True Up asked me to review the latest edition of the Electric Quilt Company’s fabric-swatch software Stash—call it a perk of using an overheating HP instead of a shiny Mac! Playing with the software and figuring out if I would shell out the cash for a future edition was a lot of fun. Check out the review on True Up.

Over at the EQ blog, I was asked to write a bit about how I designed my most recent project for American Patchwork & Quilting, Dot to Dot, using EQ6. Head over to the EQ Blog to read about the design and see a few Random Recolor experiments.

Saturday, July 04, 2009

Ransom Note No. 4: Flag Burning (work in progress)

Ransom Note No. 4 partially embroidered and glued up, ready for appliquéing

While celebrating the Fourth of July, take a moment to note that this supposedly superior land of ours actually falls quite far down quality-of-life indexes, we pay more than anywhere in the world for substandard for-profit healthcare, and civil rights can be stripped from minorities at the whim of a thin majority. Happy birthday, Hot Dog Land!

Saturday, June 06, 2009

New patterns on the newsstand

American Patchwork and Quilting, August 2009 Remember this (wow, two years ago!)? Well, now it’s all finished and you can make your own version from the pattern in American Patchwork and Quilting (August 2009 issue)! It’s an easy quilt to machine appliqué, inspired by textiles designs by Verner Panton—hence I call it Verner, though you’ll find it in the magazine as Dot to Dot. The Mother did not appreciate quilting the fiddly little spirograph designs, but they look fantastic, so thanks to her for struggling through!

My quilt in American Patchwork & Quilting, 2009

Dot to Dot quilt

Interweave Stitch, Spring 2009 If you’re flying anywhere this summer, also check out my E-Ticket Wallet pattern in the spring issue of Stitch. I got tired of wadding up my ticket printout, passport, and other bits of paper in the airport and trying not to lose them, so I made up this wallet to hold everything together. It’s made specifically to fit e-tickets, since airline-printed cardstock tickets are rapidly becoming things of the past.

E-Ticket Wallet in Stitch, Spring 2009

The one I made for myself matches my Ikea Flört laptop bag (apparently the shoulder bag is no longer on the website).

E-Ticket Wallet

E-Ticket Wallet

I also made versions of these for my family, some of them with different details on the front: A tiny pomeranian (adapted from a print by the amazing Eleanor Grolsch) for the Mother...

E-Ticket Wallet

A bird from Cute Stuff for Middle Brother’s wife...

E-Ticket Wallet

And another version with an airplane for Youngest Brother, who hopefully will be able to use the wallet when he comes to visit later this month...

E-Ticket Wallet

One word of warning though! Of all things to not be internationally standardized, passports apparently differ in dimensions slightly from country to country. The Mother went to stuff her Canadian passport into the pocket and found it wouldn’t fit (sorry for the crap gift, Mom!). So if you’re fortunate enough to carry a passport that isn’t American, you’ll probably want to measure it and adjust the pocket size accordingly.

Friday, May 22, 2009

Grand opening

Things have been a little slow over here on the blog recently, mainly because I’ve been busy getting a full-fledged website together, which is now up at www.feeddog.net. I’ll still be posting here on the blog (and I’ll probably still be tinkering with the website for a while), but the website will keep you updated on my Feed Dog Designs patterns, both those in magazines and those available in the new web shop!

felt sweets: mini jam roll + swiss cake roll

Anglo-American Snack Pack No. 1 Quite some time ago, I promised felt sweets patterns “soon.” Well, later rather than sooner, I’ve finally got a few together. To celebrate the launch of my website, you can get my first Anglo-American Snack Pack pattern free [PDF]! What’s so Anglo-American about it? Because the pattern includes both a British version—a mini jam roll—and an American version, a Swiss cake roll. They use the same pattern pieces but slightly different techniques. Go check ’em out!

3554683695

Anglo-American Snack Pack No. 2 If you like the felt rolls, Anglo-American Snack Pack No. 2, with patterns for a Bakewell tart and a snack-cake-style chocolate cupcake, is also available now in my online shop for $3.50.

I’ve done my best to make accurate, complete patterns as well as a straightforward purchase process (using PayPal) on the website, but if anything goes wrong or you have any questions, do let me know at shop [at] feeddog [dot] net. And if you make anything with the patterns, please upload a photo to the Feed Dog Designs pool on Flickr! I’ve got more patterns in the works too, especially quilt patterns, so keep an eye out.

In Between Stitches, Livermore, CA

In other news, if you happen to live nearby, my Bird Crossing quilt is hanging up at In Between Stitches in Livermore, California—one of my favorite local quilt shops. Earlier this year they moved into a new space that’s big, bright, and beautiful. Go check them out!