Pages

Thursday, December 02, 2010

Mini-tutorial: snowflake ornament 1

snowflake ornament 1 of...I lost count.

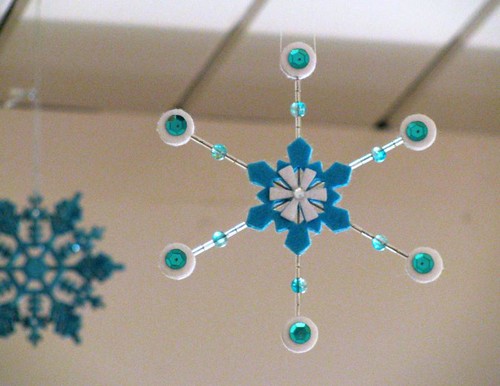
Feed Dog Flurry Let’s start with a super simple one. You could make this beaded snowflake ornament much more elaborate depending on your bead stash; I just messed about with the limited supply I had on hand.

What makes this a really brainless project is a “snowflake ornament form”—a six-spoked premade wire form. I found a pack of 7 for a couple bucks at a local craft store; you’re looking for something like this. No worries if you can’t find them, though; just use pliers to twist together 3 stiff wires about 4½" long.

The other big timesaver with this ornament (and many others in the veritable snowstorm hanging from our living room ceiling) is a sack of felt snowflake stickers, precut and prestickified in various shapes, colors, and sizes. The ones shown here came from Jo-Ann, but Michaels has slightly different ones. Again, just a couple bucks for about a hundred. This ornament also has a sneaky trick with the felt stickers—read on!

Supplies

  • 4½" wire snowflake ornament form
  • Two 1¾" and two ⅞" felt snowflake stickers
  • 24 silver or clear bugle beads
  • 6 round glass beads
  • Twelve ½" felt circle stickers (see step 3)
  • Twelve 8mm sequins
  • Craft glue
  • 2 self-stick rhinestones
  • Thread or other hangy thingy

Instructions

  1. Remove the paper backing and stick one of the larger snowflake stickers over the intersection of the wires on the ornament form, lining up the points of the sticker with the spokes of the form. Flip the form over and stick another matching snowflake sticker over the first, aligning the edges of the stickers and covering the wire. Yes folks, this ornament looks good from both sides. Squeeze the stickers together to adhere them to each other firmly.
  2. Stick a smaller snowflake sticker in the center of each larger one. I rotated my small stickers so the space between the points would match up with the precut holes in the bigger sticker behind—might as well let them show rather than covering them up.
  3. On one of the wire spokes, thread 2 bugle beads, a round bead, and 2 more bugle beads. To keep them from falling right back off, sandwich 2 felt circle stickers sticky sides together around the end of the wire. Some of the snowflakes in my bag o’ stickers had round holes in the middle, and the circles filling the holes hadn’t been removed, so I popped ’em out and used them on the ends of the spokes. (That’s the sneaky bit. Not really that sneaky.) If you’re sans snowflake doughtnut holes, cut or punch ½" circles from a sticker-backed felt sheet, or just from regular felt and use a bit of glue to stick them on the wires.
  4. Repeat step 3 for each of the wire spokes.
  5. Bling time. Use a dab of glue to stick a sequin to each of the felt circles on both sides of the ornament (let the glue dry between sides). When all the glue has dried, stick a rhinestone in the center of the ornament on both sides.
  6. Tie a loop of thread to one of the spokes (below the felt circles) or attach the hanging implement of your choice. Fin!

By the way, “mini-tutorial” means I didn’t take step-by-step photos. But really, do you need a picture to tell you how to stick a sticker?

Tune in tomorrow for more…

Wednesday, December 01, 2010

Announcing Feed Dog Flurry, a countdown to Christmas

fdf2010As I mentioned in my snowman pattern post, I’m planning to celebrate Christmas with all sorts of regular goodies here on the Feed Dog blog. Maybe I’m shooting myself in the foot adding another task to the December to-do list, but I’m aiming for a post every day between now and Christmas. (OK, it’s in writing; now I have to do it…)

To kick things off, I’ve refreshed the blog template for the first time in, oh, forever. I made the festive snowflake background because snowflakes have become my holiday motif of choice (that sounds less cheesy than “theme,” doesn’t it? No? Well, if the cheese fits…) this year. And they fit so nicely into a hexagon, which of course is a quilterly shape if there ever was one. (That is, they fit into a hexagon if they’re six-pointed, as snowflakes are in nature. I’ll have none of this eight-pointed snowflake nonsense. OK, I’ll probably have a little of it this month, so don’t hold me to anything. But in my book a snowflake has six sides for authenticity and aesthetics.)

Everybody’s busy this time of year, so the tutorials and projects I come up with will be relatively simple. I’ve been obsessively making snowflake ornaments because they’re quick and fun, so expect to see some tutes for them—some with a sewing machine, but probably more often a glue gun will be all you need. I’m a quilter at heart, but this Christmas is bringing out the miscellaneous artsy-craftsy youth somewhere inside me. That, or it’s a Valium-popping ’70s housewife who sticks sequins on Styrofoam balls to numb the pain of boredom. If either of those characters sound familiar, then follow me for a flurry of posts from now till the big day.

Monday, November 29, 2010

Cyber Monday (or Tuesday) sale

If your credit card hasn’t worn itself thin yet with the post-Thanksgiving spending frenzy, head over to Feed Dog Designs for 40% off digital pattern downloads—a special price just for blog readers!
Use coupon code CYM10 in your shopping cart to get the discounted price, any time from now through the end of Tuesday, since I didn’t have my act together earlier…
Thanks for shopping the Cyber Monday/Tuesday sale!

Wednesday, November 24, 2010

Free Pattern: Snowmen for appliqué or embroidery

OK, OK; I know tomorrow is Thanksgiving. But I’ve been itching for Christmas since the Halloween accoutrements hit stores, and for once I’ve had no problem with Chrimbo being rolled out ridiculously early by the gods on Mount Retail. (But please, keep the effing holiday music away from me. Yech. This will forever be a playlist-free blog.) I’m dying to get the tree and ornaments put up, and I’ve actually already started covering our living room ceiling with snowflakes. Last Christmas was a bit of a non-starter, so I’m ready to put my Grinchy ways aside and spread some cheer, dammit.

What does this mean for you? Well, I’m planning to share all my crafty Christmas stuff (“crap” would’ve alliterated better, but I shan’t give you crap!) with you here—photos, tutorials, patterns, and other bits of fun. So to start with, a free pattern for appliqué (or embroidery, if you like)!

Snowman tea towels

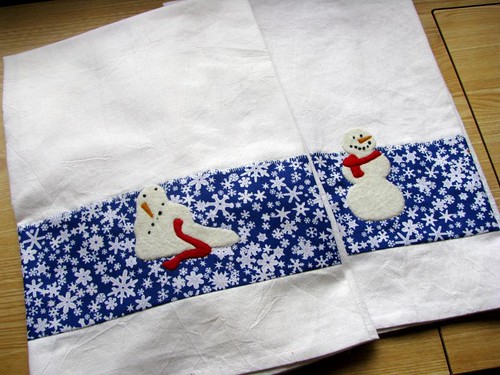
I made these tea towels for Middle Brother and his wife a couple years ago, fusing wool felt to the background to give the snowmen some dimension. A really narrow zigzag around the edge of the felt with matching or invisible thread rounds the edges rather splendidly.

Something was missing, though: how did snowman A, standing happily, become snowman B, melting into a sloppy pile of sludge? Snowman C, armed with a hairdryer, is the culprit:

Snowmen, Before
Snowmen, After

Why is Snowman C so ill-spirited? You’ll have to supply your own motivation; I’m just supplying the pattern.
If you’re not feeling the appliqué, try a melting redwork snowman instead:

Snowmen in Redwork

Two formats are available:
  • Get the PDF to print out and transfer for your favorite appliqué or embroidery technique.
  • Get the EQ7 project file to use the snowmen blocks (on the Motifs tab) in your own quilts or other EQ designs.
Designs are copyright © 2010 Feed Dog Designs, but you’re free to use them on Christmas gifts, decor, or whatever you like. Happy stitching, happy Thanksgiving, and look for more holiday goodies here soon!

Sunday, October 31, 2010

Happy Halloween

5133991357

It’s only fair that Felis Domesticus Minor be subjected to the same Halloween torment as her big sister two years ago.