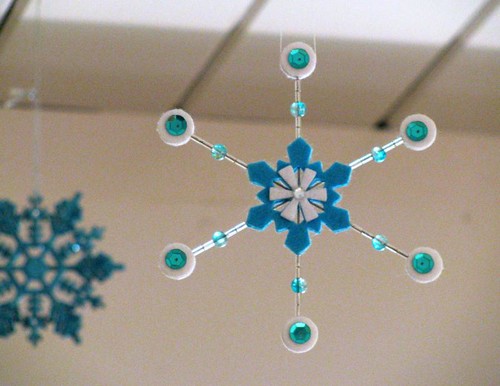

What makes this a really brainless project is a “snowflake ornament form”—a six-spoked premade wire form. I found a pack of 7 for a couple bucks at a local craft store; you’re looking for something like this. No worries if you can’t find them, though; just use pliers to twist together 3 stiff wires about 4½" long.
The other big timesaver with this ornament (and many others in the veritable snowstorm hanging from our living room ceiling) is a sack of felt snowflake stickers, precut and prestickified in various shapes, colors, and sizes. The ones shown here came from Jo-Ann, but Michaels has slightly different ones. Again, just a couple bucks for about a hundred. This ornament also has a sneaky trick with the felt stickers—read on!
Supplies
- 4½" wire snowflake ornament form
- Two 1¾" and two ⅞" felt snowflake stickers
- 24 silver or clear bugle beads
- 6 round glass beads
- Twelve ½" felt circle stickers (see step 3)
- Twelve 8mm sequins
- Craft glue
- 2 self-stick rhinestones
- Thread or other hangy thingy
Instructions
- Remove the paper backing and stick one of the larger snowflake stickers over the intersection of the wires on the ornament form, lining up the points of the sticker with the spokes of the form. Flip the form over and stick another matching snowflake sticker over the first, aligning the edges of the stickers and covering the wire. Yes folks, this ornament looks good from both sides. Squeeze the stickers together to adhere them to each other firmly.
- Stick a smaller snowflake sticker in the center of each larger one. I rotated my small stickers so the space between the points would match up with the precut holes in the bigger sticker behind—might as well let them show rather than covering them up.
- On one of the wire spokes, thread 2 bugle beads, a round bead, and 2 more bugle beads. To keep them from falling right back off, sandwich 2 felt circle stickers sticky sides together around the end of the wire. Some of the snowflakes in my bag o’ stickers had round holes in the middle, and the circles filling the holes hadn’t been removed, so I popped ’em out and used them on the ends of the spokes. (That’s the sneaky bit. Not really that sneaky.) If you’re sans snowflake doughtnut holes, cut or punch ½" circles from a sticker-backed felt sheet, or just from regular felt and use a bit of glue to stick them on the wires.
- Repeat step 3 for each of the wire spokes.
- Bling time. Use a dab of glue to stick a sequin to each of the felt circles on both sides of the ornament (let the glue dry between sides). When all the glue has dried, stick a rhinestone in the center of the ornament on both sides.
- Tie a loop of thread to one of the spokes (below the felt circles) or attach the hanging implement of your choice. Fin!
By the way, “mini-tutorial” means I didn’t take step-by-step photos. But really, do you need a picture to tell you how to stick a sticker?
Tune in tomorrow for more…

1 comment:
Thank you so much for sharing. You are very talented.
Post a Comment